


本文介绍了Node.js中用于处理文件上传的Multer中间件。阐述了使用Multer的先决条件,包括了解HTML表单、安装Node.js等。详细说明了项目设置、安装依赖的步骤,以及如何使用Multer上传单个和多个文件,还介绍了DiskStorage引擎、其他配置选项和错误处理方法
概述
文件上传和下载已成为我们经常执行的非常常用的操作。以任何社交媒体应用程序为例;用户可以上传图像,也可以下载网站上显示的图像。因此,对于开发人员来说,了解文件处理是如何完成的和客户端以及这些文件如何存储在服务器端变得很重要。
先决条件
- 了解 HTML 表单或任何表单 API。
- 必须安装Node.js。
- 对 Node.js 和 Express 有很好的理解。
- 了解请求-响应架构和中间件。
Multer 简介
Node.js中的 Multer 是一个中间件,用于轻松处理文件上传完成后使用的多部分/表单数据。为了获得最大的效率,Multer 构建在 busboy 之上,busboy 是一个node.js模块,用于处理请求中传入的 HTML 表单数据。Multer 在功能上类似于 Node.js 中的 body 解析器(一种快速中间件),但它只支持多部分数据。
当我们在 HTML 中创建任何表单时,默认情况下,ENCTYPE 属性的值为 application/x-www-form-urlencoded。ENCTYPE属性指定在请求中发送数据时如何对表单数据进行编码。默认内容类型以键值对的形式对数据进行编码。这种类型的结构不支持文件上传操作。
multipart/form-data 是一种内容类型,它使浏览器以多部分消息的格式对表单数据进行编码。其中的每个部分都由一个文本输入和一个文件输入组成,用于表示表单中的每个字段。
Multer 被广泛使用,因为它简单、非常高效,并且还支持多个文件上传。Multer 通过向请求对象添加两个对象来操作请求对象 – 即 body 对象和 file/files 对象。Multer 添加的 body 对象包含来自 HTML 表单中文本字段的数据。文件或文件对象包含在表单中上传的文件。它们可以作为 req.body 和 req.file 或 req.files 访问,其中 req 是请求对象。
在Multer的帮助下,只能处理多部分数据(multipart/form-data)。无法处理其他格式。在本文中,您将学习如何在Node.js中使用 Multer 来简化处理多个文件上传的过程。Multer 还提供了许多在文件存储期间应用的选项或设置。
项目设置
要了解 Multer,让我们创建一个小项目。在这里,我们将创建一个 multipart/form-data 的 HTML表单,并使用它来尝试 multer 的不同功能。
现在,作为第一步,创建一个项目目录并将其命名为 multer-demo。在此项目目录中,创建一个文件index.html,我们将在其中制作 HTML 表单。在index.html文件中编写以下代码,以创建一个包含表单的网页。
<!DOCTYPE html>
<html lang = "en">
  <head>
    <meta charset = "UTF-8" />
    <meta name = "viewport" content = "width=device-width, initial-scale=1.0" />
    <title> Multer demo </title>
    <style>
      /* A set of css styles that you can change to make the form attractive. Right now basic styling is used.*/
      .myform {
        display: block;
        margin: auto;
      }
      .form-field {
        padding: 10px;
      }
      .form-field > input {
        display: block;
        margin: auto;
      }
      .form-field > label {
        display: block;
        text-align: center;
      }
    </style>
  </head>
  <body>
    <div>
      <!-- Create an HTML form with the value of action as URL of API endpoint, encoding as multipart data and request method as POST-->
      <form
        action = "http://localhost:3000/upload"
        enctype = "multipart/form-data"
        method = "post"
        class = "myform"
      >
        <div class = "form-field">
          <label>FirstName</label>
          <input
            type = "text"
            id = "firstName"
            name = "firstName"
            placeholder = "Enter your firstname"
          />
        </div>
        <div class = "form-field">
          <label>LastName</label>
          <input
            type = "text"
            id = "lastName"
            name = "lastName"
            placeholder = "Enter your lastname"
          />
        </div>
        <div class = "form-field">
          <label>Upload file here</label>
          <input type = "file" id = "myFile" name = "myFile" multiple = "true" />
        </div>
        <div class = "form-field">
          <input type = "submit" />
        </div>
      </form>
    </div>
  </body>
</html>
在上面的代码中,使用了表单标签,并且 enctype 属性已设置为 multipart/form-data。表单具有用于为 firstName 和 lastName 创建文本输入字段的输入标记,以及用于支持文件上传的文件输入。窗体当前将 action 属性设置为 http://localhost:3000/upload,方法为 POST。我们将在 Node.js 中创建的 API 的 url 在 action 属性中指定。
现在,要创建一个 API 来处理 post 请求,您必须在系统中安装 Node.js。要检查系统中是否安装了Node.js,请在终端中执行以下命令。
$ node -v
如果您的系统中安装了Node.js,上述命令将给出系统中安装的Node.js版本,例如 v16.17.1。
如果出现“找不到命令”错误,则系统中未安装Node.js。您可以借助节点网站上提供的安装程序轻松安装Node.js。
安装 Node.js 后,若要设置Node.js项目,请在当前目录中运行以下命令。
$ npm init
上述命令将询问一组问题,如下所示:
This utility will walk you through creating a package.json file.
It only covers the most common items, and tries to guess sensible defaults.
See `npm help init` for definitive documentation on these fields
and exactly what they do.
Use `npm install <pkg>` afterwards to install a package and
save it as a dependency in the package.json file.
Press ^C at any time to quit.
package name: (multer-tutorial)
version: (1.0.0)
description: A tutorial about multer
entry point: (index.js) server.js
test command:
git repository:
keywords:
author:
license: (ISC)
About to write to C:\Users\HP\Documents\DivyaGo\middleware-nodejs\multer-tutorial\package.json:
{
  "name": "multer-tutorial",
  "version": "1.0.0",
  "description": "A tutorial about multer",
  "main": "server.js",
  "scripts": {
    "test": "echo \"Error: no test specified\" && exit 1"
  },
  "author": "",
  "license": "ISC"
}
Is this OK? (yes) yes
回答所有问题后,将创建一个包含有关应用程序的所有信息的package.json文件。
安装
现在,要创建 API,您将需要一些其他节点模块,这些模块必须使用 Node Package Manager 进行安装。执行以下命令安装 express 和 multer。
$ npm i express multer
成功执行上述命令后,package.json会在依赖项下显示 express 和 multer 及其对应版本。
使用 Multer 上传文件
现在,在安装所需的依赖项后,您可以开始构建 API 来学习 Multer 的使用。 创建一个文件server.js,并在其中编写以下代码,在 express 的帮助下创建一个服务器。
// Import express
const express = require("express");
const PORT = process.env.PORT || 3000;
// Create instance of express.
const app = express();
// Include express.json() middleware
app.use(express.json());
// Include express.urlencoded() middleware
app.use(express.urlencoded({ extended: true }));
// Create a GET endpoint for '/' route
app.get("/", (req, res) => {
    res.send("Welcome to API");
});
// Create a POST endpoint for '/upload' route
app.post("/upload", (req, res) => {
    console.log(req.body);
    res.send("Endpoint for file upload.");
});
// Listen on the specified port.
app.listen(PORT, () => {
    console.log(`Server started on port : ${PORT}`);
});
在上面的代码中,express 是在 require() 函数的帮助下导入的。使用了 express.json() 和 express.urlencoded() 中间件。express.json() 用于解析具有 JSON 有效负载的传入请求对象。express.urlencoded() 用于解析具有 urlencoded 有效负载的请求对象。它们都在正文解析器上运行。已在 / 处创建了一个 GET 端点,在 /upload 处创建了一个 POST 端点。已指定应用程序侦听端口 3000。
在终端中运行节点server.js时,服务器将启动。终端中将显示以下消息:
$ node server.js
Server started on port : 3000
现在,您可以在浏览器的帮助下发送请求。在浏览器上打开 http://localhost:3000。它将显示以下消息:
Welcome to API
现在在浏览器中打开 HTML 文件并在文本字段中填写一些详细信息。在文件输入中上传文件并提交表单。 用于文件上载的消息终结点。将显示在浏览器上,并且终端将注销 req.body 的值为 : { }。 这意味着正文解析器无法处理分段格式数据。因此,这里需要 Multer。
添加和配置 Multer
现在要添加 Multer,您需要使用 require() 函数导入它。 我们还需要设置需要存储编码文件的文件夹。这可以通过在 multer 中指定 dest 属性来配置。因此,在server.js文件的顶部添加以下两行。
const multer  = require('multer')
const upload = multer({ dest: 'uploads/' })
如果未指定 dest 属性,则文件将保存在内存中,但永远不会写入磁盘。 现在我们将更改我们的 POST 路由,以支持在 multer 的帮助下存储文件。 按如下方式更改邮寄路线:
app.post("/upload", upload.single("myFile"), (req, res) => {
    console.log("Body: ", req.body);
    console.log("File: ", req.file);
    res.send("File successfully uploaded.");
});
multer({..}).single() 用于我们想要处理单个文件的上传。myFile 是我们为 HTML 表单的文件输入标记指定的 name 属性的值。Multer 会将文本输入的值保存在 body 对象中,将文件保存在 file 对象中。 在上面的代码中,我们记录了 req.body 和 req.file 对象。然后发送文件已成功上传的响应。
现在,您的最终server.js代码将变为:
// Import express
const express = require("express");
const multer = require("multer");
const upload = multer({ dest: "uploads/" });
const PORT = process.env.PORT || 3000;
// Create instance of express.
const app = express();
// Include express.json() middleware
app.use(express.json());
// Include express.urlencoded() middleware
app.use(express.urlencoded({ extended: true }));
// Create a GET endpoint for '/' route
app.get("/", (req, res) => {
    res.send("Welcome to API");
});
// Create a POST endpoint for '/upload' route
app.post("/upload", upload.single("myFile"), (req, res) => {
    console.log("Body: ", req.body);
    console.log("File: ", req.file);
    res.send("File successfully uploaded.");
});
// Listen on the specified port.
app.listen(PORT, () => {
    console.log(`Server started on port : ${PORT}`);
});
现在再次启动服务器并在浏览器中打开 HTML 文件。现在填写表格并上传文件,然后提交。
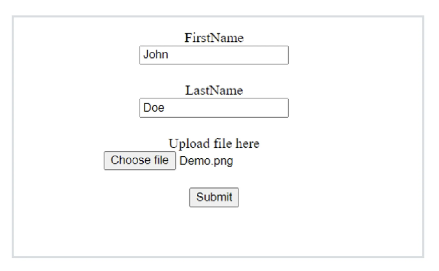
提交表单后,浏览器上将显示以下消息:
文件已成功上传。
在终端中,将出现以下日志:
$ node server
Server started on port : 3000
Body:  [Object: null prototype] { firstName: 'John', lastName: 'Doe' }
File:  {
  fieldname: 'myFile',
  originalname: 'Demo.png',
  encoding: '7bit',
  mimetype: 'image/png',
  destination: 'uploads/',
  filename: '6cb17b42bb4625f6b96b0c30f6835d7a',
  path: 'uploads\\6cb17b42bb4625f6b96b0c30f6835d7a',
  size: 889749
}
body 对象包含作为键值对的文本输入。file 对象包含已存储文件的元数据。现在,您将能够在项目目录中看到上传文件夹。在 uploads 文件夹中,将存储一个文件,其名称与 req.file 对象中的 filename 字段相同。在我们的例子中,它是 6cb17b42bb4625f6b96b0c30f6835d7a。
通常的做法是将文件存储在服务器上的某个目录中,并将元数据或 req.file 对象保存在数据库中。这允许轻松获取和解码文件以供进一步使用。
元数据包含以下字段:
| 关键字 | 描述 |
|---|---|
| 拟态型 | 文件的 MIME 类型 |
| 路径 | 磁盘存储中已上载文件的完整路径。 |
| 字段名称 | 表单中指定的字段名称 |
| 目的地 | 文件已保存在磁盘中的文件夹。 |
| 文件名 | 磁盘中目标中的文件的名称。 |
| 原名 | 用户计算机上的文件的名称 |
| 缓冲区 | 存储在内存中的整个文件的缓冲区。 |
| 编码 | 文件的编码类型 |
| 大小 | 文件大小(以字节为单位) |
现在,如果你想对文件的存储有更多的控制权,你必须使用 diskStorage 引擎而不是 dest 对象。
DiskStorage 的使用
要完全控制文件的存储,例如名称和目标,您需要使用磁盘存储引擎。multer diskStorage 可以按如下方式使用:
var storage = multer.diskStorage({
     destination: function(req, file, cb) {
	 // destination is used to specify the path of the directory in which the files have to be stored
     cb(null, './uploads');
   },
   filename: function (req, file, cb) {
// It is the filename that is given to the saved file.
      cb(null , file.originalname);
   }
});
// Configure storage engine instead of dest object.
const upload = multer({ storage: storage })
磁盘存储引擎允许操作文件名和目标。
- destination – 它可以作为字符串或函数给出。如果未指定,则使用操作系统指定的临时文件的默认目录。如果将字符串作为目标,则 Multer 将创建目录;否则,如果给定了一个函数,则必须事先创建目录。
- filename – 它确定保存在目标目录中的文件的名称。如果未指定,则给出一个没有扩展名的随机名称。定义的函数应返回完整的文件名和扩展名。
destination 和 filename 函数采用三个参数 – 请求对象 (req)、文件对象 (file) 和回调函数 (cb)。 回调函数采用两个参数:error 和用于保存文件的名称。在上面的语法中,使用了原始名称。
让我们制作一个示例应用程序,其中我们将根据文件类型将文件保存在两个目录中:图像和其他目录。图像将包含图像,其他图像将包含其余文件。文件名将是当前日期(以毫秒为单位)与原始名称和扩展名相结合。
在 uploads 文件夹中制作两个目录图像和其他目录。用 server.js 编写以下代码。
// Import express
const express = require("express");
const multer = require("multer");
const multerStorage = multer.diskStorage({
  destination: (req, file, cb) => {
    // Get the type of file.
    const ext = file.mimetype.split("/")[0];
    if (ext === "image") {
        // if type is image then store in images folder
      cb(null, "uploads/images");
    } else {
        // In case of not an image store in others
      cb(null, "uploads/others");
    }
  },
  filename: (req, file, cb) => {
    // Combine the Date in milliseconds and original name and pass as filename
    cb(null, `${Date.now()}.${file.originalname}`);
  },
});
// Use diskstorage option in multer
const upload = multer({ storage: multerStorage });
const PORT = process.env.PORT || 3000;
// Create instance of express.
const app = express();
// Include express.json() middleware
app.use(express.json());
// Include express.urlencoded() middleware
app.use(express.urlencoded({ extended: true }));
// Create a GET endpoint for '/' route
app.get("/", (req, res) => {
    res.send("Welcome to API");
});
// Create a POST endpoint for '/upload' route
app.post("/upload", upload.single("myFile"), (req, res) => {
    console.log("Body: ", req.body);
    console.log("File: ", req.file);
    res.send("File successfully uploaded.");
});
// Listen on the specified port.
app.listen(PORT, () => {
    console.log(`Server started on port : ${PORT}`);
});
在上面的代码中,已经配置了 diskStorage,并且 multer 设置了存储引擎而不是目标对象。destination 和 filename 函数已在 diskStorage 配置中定义。目标根据文件类型使用 if-else 确定,文件名将日期和原始名称连接在一起。
上传图像时,我们在终端中得到了以下日志:
Body:  [Object: null prototype] { firstName: 'John', lastName: 'Doe' }
File:  {
  fieldname: 'myFile',
  originalname: 'Demo.png',
  encoding: '7bit',
  mimetype: 'image/png',
  destination: 'uploads/images',
  filename: '1667727488632.Demo.png',
  path: 'uploads\\images\\1667727488632.Demo.png',
  size: 889749
}
该文件以我们选择的名称保存在 uploads/images 目录中。
上传.txt文件时,会给出以下日志:
Body:  [Object: null prototype] { firstName: 'John', lastName: 'Doe' }
File:  {
  fieldname: 'myFile',
  originalname: 'demo.txt',
  encoding: '7bit',
  mimetype: 'text/plain',
  destination: 'uploads/others',
  filename: '1667727698642.demo.txt',
  path: 'uploads\\others\\1667727698642.demo.txt',
  size: 0
}
该文件以我们选择的名称保存在 uploads/others 目录中。 uploads 目录现在具有以下结构:
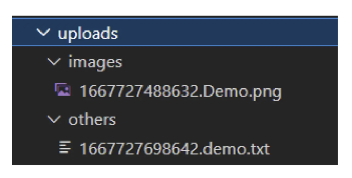
因此,diskStorage 可以帮助对保存文件的目标和文件名提供更多控制。
穆尔特的其他选择
multer 中还有一些其他重要的选项可用于配置文件上传。
限制:limits 对象用于提供上传文件大小的上限、fieldNameSize 和其他字段(如字段、部件等)的数量。 下面是一个限制文件大小的小示例:
const upload = multer({
       storage: storage,
       limits : {fileSize : 1000000} // fileSize in bytes
});
limits 对象可以帮助防止 DOS(拒绝服务)攻击。
文件过滤器 :此函数用于决定必须存储哪些文件以及可以忽略哪些文件。
filefilter的语法:
function fileFilter (req, file, cb) {
   //  callback function has a boolean passed to decide whether to keep the file or not.
   // To reject this file pass `false`:
   cb(null, false);
   // To accept the file pass `true`:
   cb(null, true);
   // Create error if something goes wrong:
   cb(new Error('Unhandled Error!'));
}
假设我们只想要图像:
function fileFilter(req, file, cb) {
    const type = file.mimetype.split("/")[0];
    // Check if the type of file is an image.
    if (type === "image") {
        return cb(null, true);
    } else {
        cb("Error: Only Images!");
    }
}
错误处理
您可以通过自己调用 multer 中间件并使用附加到 multer 对象本身的 MulterError 类来处理 multer 中的错误。
const multer = require('multer')
const upload = multer().single('myFile')
app.post('/upload', function (req, res) {
  upload(req, res, function (err) {
    if (err instanceof multer.MulterError) {
      // A Multer error occurred when uploading.
    } else if (err) {
      // An unknown error occurred when uploading.
    }
    // If no error occurs.
  })
})
JavaScript Maestro 寻求全栈精通?报名参加我们的全栈课程,发现前端和后端开发的交响乐。
上传多个文件
我们可以在 .arrays(fieldname[, max_count]) 的帮助下上传多个文件。可以上传名称为 fieldname 的文件和最多 max_count 个文件数。若要处理多个文件上传,可以按如下方式更改 POST 端点:
app.post("/upload", upload.array("myFile"), (req, res) => {
    // .array() is used to support upload of multiple files.
    console.log("Body: ", req.body);
    console.log("Files: ", req.files);
    res.send("Files successfully uploaded.");
});
对于多个文件,file 的标记将多个属性设置为 true。
<input type="file" id="myFile" name="myFile" multiple="true" />
发送多个文件时,输出将类似于以下内容:
Body:  [Object: null prototype] { firstName: 'John', lastName: 'Doe' }
Files:  [
  {
    fieldname: 'myFile',
    originalname: 'demo.txt',
    encoding: '7bit',
    mimetype: 'text/plain',
    destination: 'uploads/others',
    filename: '1667730445863.demo.txt',
    path: 'uploads\\others\\1667730445863.demo.txt',
    size: 0
  },
  {
    fieldname: 'myFile',
    originalname: 'Demo.png',
    encoding: '7bit',
    mimetype: 'image/png',
    destination: 'uploads/images',
    filename: '1667730445864.Demo.png',
    path: 'uploads\\images\\1667730445864.Demo.png',
    size: 889749
  }
]
files 数组将包含每个文件的对象。
多个字段
为了接受来自多个字段的文件,我们可以使用 upload.fields() 函数来指定字段及其对应的最大计数。 下面是一个示例:
[
  { name: 'field_nameA', maxCount: 1 },
  { name: 'field_nameB', maxCount: 8 }
]
如图所示,fields 是具有各种字段配置的对象数组。
仅接受文本字段
upload.none() 可用于不允许上传文件。如果使用 .none(),则LIMIT_UNEXPECTED_FILE文件上传完成。
更新 post 终结点,如下所示:
app.post("/upload", upload.none(), (req, res) => {
  console.log("Body: ", req.body);
  console.log("Files: ", req.files);
  res.send("Files successfully uploaded.");
});
现在尝试在上传文件后提交表单,您将看到以下内容。
MulterError: Unexpected field
接受所有文件
upload.any() 可用于接受所有类型和大小的文件。
更新 POST 终结点,如下所示:
app.post("/upload", upload.any(), (req, res) => {
  console.log("Body: ", req.body);
  console.log("Files: ", req.files);
  res.send("Files successfully uploaded.");
});
现在,您将能够上传任何类型的文件。
结论
- Node.js中的 Multer 是一个中间件,用于轻松处理文件上传完成后使用的多部分/表单数据。
- 为了获得最大的效率,Multer 构建在 busboy 之上,busboy 是一个node.js模块,用于处理请求中传入的 HTML 表单数据。
- multipart/form-data 是一种内容类型,它使浏览器以多部分消息的格式对表单数据进行编码。其中的每个部分都由一个文本输入和一个文件输入组成,用于表示表单中的每个字段。
- dest 对象配置为设置要存储文件的目录。
- multer({..}).single() 用于我们想要处理单个文件的上传。
- 为了更好地控制文件的保存,必须使用 diskStorage 引擎。
- limits 和 fileFilter 用于对文件施加限制。
- 穆尔特。MulterError 类可用于错误处理。
- 我们可以在 .arrays(fieldname[, max_count]) 的帮助下上传多个文件。
- 为了接受来自多个字段的文件,我们可以使用 upload.fields() 函数来指定字段及其相应的最大计数。
到此这篇关于Node js 中的 Multer中间件(文件上传)的文章就介绍到这了,更多相关Node js Multer内容请搜索脚本之家以前的文章或继续浏览下面的相关文章希望大家以后多多支持脚本之家!
来源链接:https://www.jb51.net/javascript/338607lol.htm
如有侵犯您的版权,请及时联系3500663466#qq.com(#换@),我们将第一时间删除本站数据。


暂无评论内容