


在容灾备份领域,有多种高可用方案,corosync+pacemaker无疑是开源方案中的佼佼者。
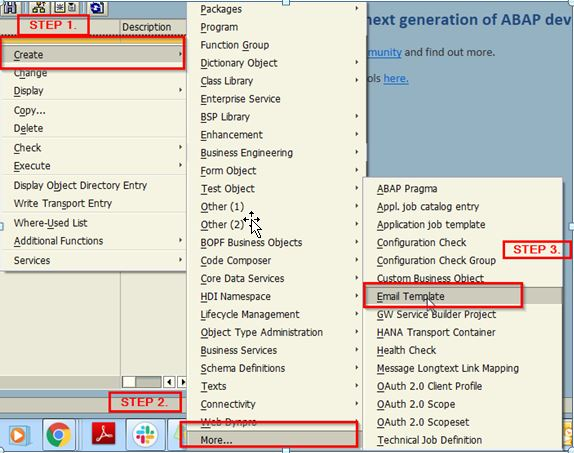
1. 什么是corosync、pacemaker、pcs?
- Corosync是集群管理套件的一部分,通常会与其他资源管理器一起组合,使用它在传递信息的时候可以通过一个简单的配置文件来定义信息传递的方式和协议等。它是一个新兴的软件,2008年推出,但其实它并不是一个真正意义上的新软件,在2002年的时候有一个项目Openais,它由于过大,分裂为两个子项目,其中可以实现HA心跳信息传输的功能就是Corosync ,它的代码60%左右来源于Openais。Corosync可以提供一个完整的HA功能,但是要实现更多,更复杂的功能,那就需要使用Openais了。Corosync是未来的发展方向,在以后的新项目里,一般采用Corosync,而hb_gui可以提供很好的HA管理功能,可以实现图形化的管理。另外相关的图形化有RHCS的套件luci+ricci,当然还有基于java开发的LCMC集群管理工具。
- Pacemaker是一个集群资源管理器。它利用集群基础构件(OpenAIS、heartbeat或corosync)提供的消息和成员管理能力来探测并从节点或资源级别的故障中恢复,以实现群集服务(亦称资源)的最大可用性。
- Pcs是一种常用的集群配置及管理指令集,其他类似命令有crmsh。
2. 环境准备
1、保证两个节点上的/etc/hosts文件均添加了下面的内容
10.10.4.176 g0001210030-00-server01
10.10.4.177 g0001210030-00-server02
2、关闭防火墙(每个节点都需执行)
setenforce 0
sed -i.bak "s/SELINUX=enforcing/SELINUX=permissive/g" /etc/selinux/config
systemctl disable firewalld.service
systemctl stop firewalld.service
iptables --flush
3、查看主备机是否安装ntp服务
systemctl status ntpd.service

若未安装ntp服务,先安装,确认安装ntp服务后,主机执行以下命令
cp /etc/ntp.conf /etc/ntp.conf.bak
rm -f /etc/ntp.conf
vi /etc/ntp.conf
在/etc/ntp.conf文件输入以下内容
restrict default kod nomodify notrap nopeer noquery
restrict -6 default kod nomodify notrap nopper noquery
restrict 127.0.0.1
restrict -6::1
restrict 10.10.1.0 mask 255.255.0.0 nomodify notrap
server 10.10.4.176
server 127.127.1.0
fudge 127.127.1.0 stratum 10
启动主机ntp服务
#systemctl start ntpd.service
备机执行以下命令
ntpdate 10.10.4.176
如果出现下面提示
21 Sep 18:01:41 ntpdate[2604]: no server suitable for synchronization found
稍等片刻再执行一次
ntpdate 10.10.4.176
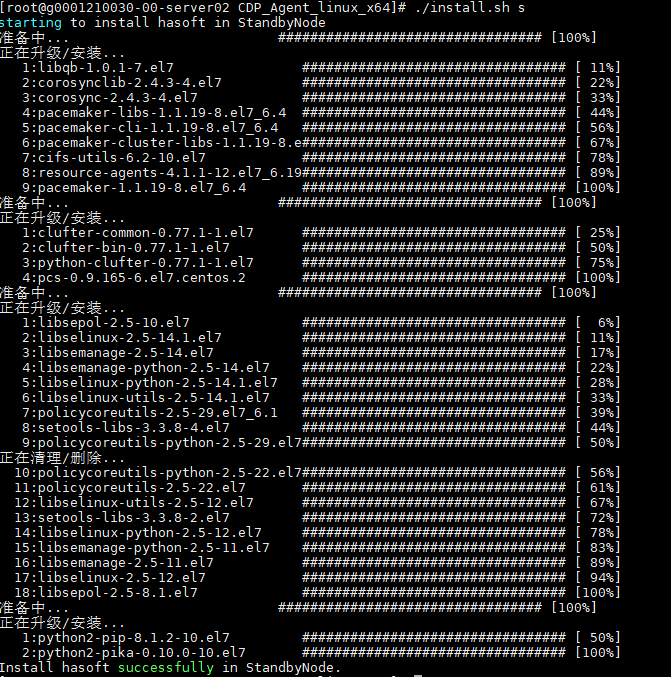
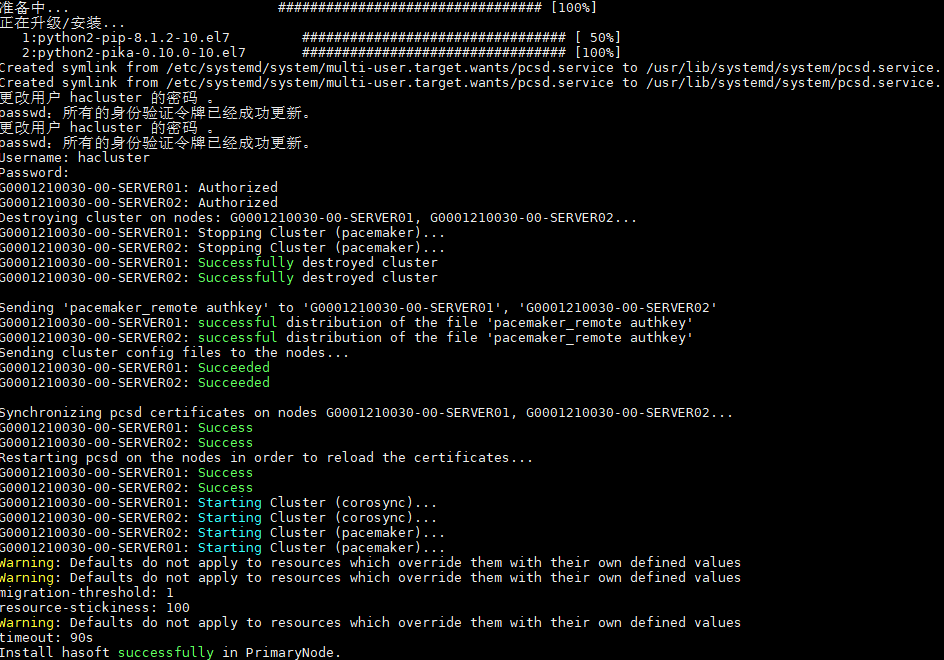
3. 安装集群软件
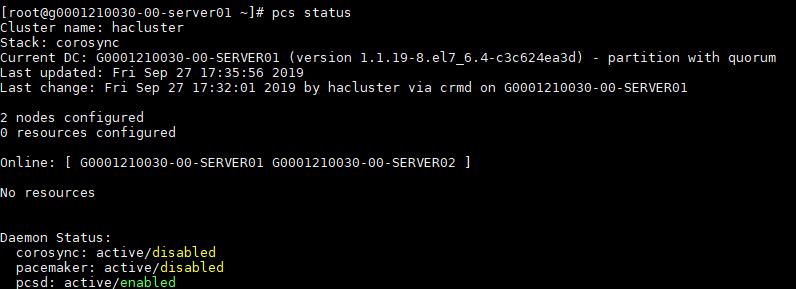
安装完毕,输入pcs status查询集群状态为下图所示,表示集群安装成功
4. 集群资源配置
1、注意:配置集群资源时,为防止资源启动的节点不一致,需要暂时将备节点的集群服务停止。在任意节点输入
pcs cluster stop G0001210030-00-SERVER02
即可关闭备节点集群服务。
2、配置浮动IP和ha服务高可用(ip需根据实际情况修改、在任意节点配置即可)
pcs resource create vip ocf:heartbeat:IPaddr2 ip=192.168.8.53 cidr_netmask=16 op monitor interval=30s
pcs resource create ha systemd:ha op monitor interval=60s timeout=60s on-fail=restart
配置资源关系
pcs constraint colocation add vip ha INFINITY
设置启动顺序
pcs constraint order vip then ha
3、配置其他资源,如mariadb数据库服务(在任意节点配置即可,需要注意的是:配置mariadb服务高可用需要将mariadb服务设置为开机不自启)
pcs resource create mysql-s systemd:mariadb op monitor interval=60s timeout=60s on-fail=restart
配置资源关系
pcs constraint colocation add ha mysql-s INFINITY
设置启动顺序
pcs constraint order ha then mysql-s
至此整个搭建过程完毕。
© 版权声明
本站所有资源来自于网络,仅供学习与参考,请勿用于商业用途,否则产生的一切后果将由您(转载者)自己承担!
如有侵犯您的版权,请及时联系3500663466#qq.com(#换@),我们将第一时间删除本站数据。
如有侵犯您的版权,请及时联系3500663466#qq.com(#换@),我们将第一时间删除本站数据。
THE END


暂无评论内容