


使用官方github包,部分解释来源于Viewer – Cesium Documentation
Cesium
.
Ion
.
defaultAccessToken
=
“token”
;
const
viewer
=
new
Cesium
.
Viewer
(
“cesiumContainer”
);
viewer
.
entities
.
add
({
//entities获取实体集合
id
:
“red rectangle,zIndex 1”
,
rectangle
: {
//设置或者获取矩形
coordinates
:
Cesium
.
Rectangle
.
fromDegrees
(
-110.0
,
20
,
-100.5
,
30.0
),
//左下角经纬右上角经纬
material
:
Cesium
.
Color
.
RED
,
zIndex
:
1
,
//一个属性,指定用于排序地面几何的 zIndex。仅当矩形为常量且未指定
//height 或 extrudedHeight 时才有效。
},
});
viewer
.
entities
.
add
({
id
:
“Textured rectangle, zIndex 2”
,
rectangle
: {
coordinates
:
Cesium
.
Rectangle
.
fromDegrees
(
-112.0
,
25.0
,
-102.5
,
35.0
),
material
:
“../images/Cesium_Logo_Color.jpg”
,
zIndex
:
2
,
},
});
viewer
.
entities
.
add
({
id
:
“Blue rectangle, zIndex 3”
,
rectangle
: {
coordinates
:
Cesium
.
Rectangle
.
fromDegrees
(
-110.0
,
31.0
,
-100.5
,
41.0
),
material
:
Cesium
.
Color
.
BLUE
,
zIndex
:
3
,
},
});
viewer
.
entities
.
add
({
id
:
“Textured rectangle, zIndex 3”
,
rectangle
: {
coordinates
:
Cesium
.
Rectangle
.
fromDegrees
(
-99.5
,
20.0
,
-90.0
,
30.0
),
material
:
“../images/Cesium_Logo_Color.jpg”
,
zIndex
:
3
,
},
});
viewer
.
entities
.
add
({
id
:
“Green rectangle, zIndex 2”
,
rectangle
: {
coordinates
:
Cesium
.
Rectangle
.
fromDegrees
(
-97.5
,
25.0
,
-88.0
,
35.0
),
material
:
Cesium
.
Color
.
GREEN
,
zIndex
:
2
,
},
});
viewer
.
entities
.
add
({
id
:
“Blue rectangle, zIndex 1”
,
rectangle
: {
coordinates
:
Cesium
.
Rectangle
.
fromDegrees
(
-99.5
,
31.0
,
-90.0
,
41.0
),
material
:
Cesium
.
Color
.
BLUE
,
zIndex
:
1
,
},
});
if
(!
Cesium
.
Entity
.
supportsPolylinesOnTerrain
(
viewer
.
scene
)) {
//检查给定场景是否支持夹在地形或 3D 平铺上的折线。
//如果不支持此功能,具有折线图形的实体将在提供的高度处使用顶点进行渲染,
//并使用 `arcType` 参数而不是固定在地面上。
window
.
alert
(
“Polylines on terrain are not supported on this platform ,Z-index will be ignored”
);
}
if
(!
Cesium
.
Entity
.
supportsMaterialsforEntitiesOnTerrain
(
viewer
.
scene
)) {
//检查给定场景是否支持覆盖在地形或 3D 平铺上的实体上的颜色以外的材质。
//如果不支持此功能,则具有非颜色材质但没有’高度’的实体将被渲染为高度为 0。
window
.
alert
(
“Textured materials on terrain polygons are not
supported on this platform, Z-index will be ignored”
);
}
viewer
.
entities
.
add
({
id
:
“Polyline, zIndex 2”
,
polyline
: {
positions
:
Cesium
.
Cartesian3
.
fromDegreesArray
([
-120.0
,
22.0
,
-80.0
,
22.0
,
]),
//指定定义线带的 Cartesian3 位置数组
width
:
8.0
,
material
:
new
Cesium
.
PolylineGlowMaterialProperty
({
//映射到折线发光 Material
glowPower
:
0.2
,
//发光强度,占总线宽的百分比
color
:
Cesium
.
Color
.
BLUE
,
//taperPower:一个数字属性,指定锥形效果的强度,
//以总线条长度的百分比表示。如果为 1.0 或更高,则不使用锥形效果。
}),
zIndex
:
2
,//深度信息
clampToGround
:
true
,
//指定折线是否应固定在地面上。
},
});
viewer
.
zoomTo
(
viewer
.
entities
);
//zoomTo (target, offset(可选) )
//异步设置相机以查看提供的实体、实体或数据源。
//如果数据源仍在加载过程中或可视化仍在加载中,则此方法在执行缩放之前等待数据准备好。
//偏移量是本地东西北上参考系中的航向/俯仰/范围,以边界球的中心为中心。
//航向角和俯仰角在当地东西北上参考系中定义。航向是从 y 轴到 x 轴增加的角度。俯仰是从 xy 平面的旋转。
//正俯仰角在平面上方。
//负俯仰角位于平面下方。范围是到中心的距离。如果范围为零,则将计算范围以使整个边界球体可见。
//在 2D 中,必须有自上而下的视图。摄像机将放置在目标上方向下看。目标上方的高度将是范围。
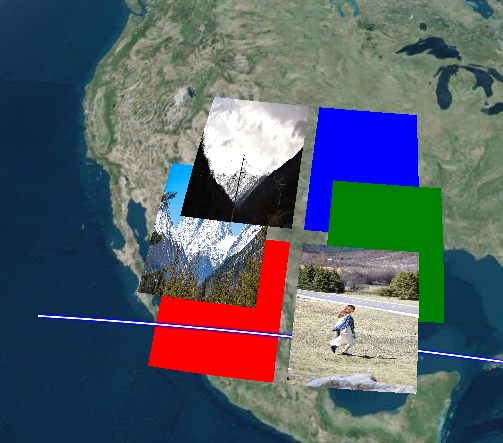
/ /航向将根据偏移量确定。如果无法根据偏移量确定航向,则航向将为北。 运行结果图:(与代码略有不同,更换了图片路径和内容 (material:))
如有侵犯您的版权,请及时联系3500663466#qq.com(#换@),我们将第一时间删除本站数据。


暂无评论内容