

1. 认识链表
- 链表是一种通过指针的形式把一组存储单元联系在一起的数据结构。
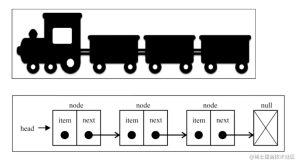
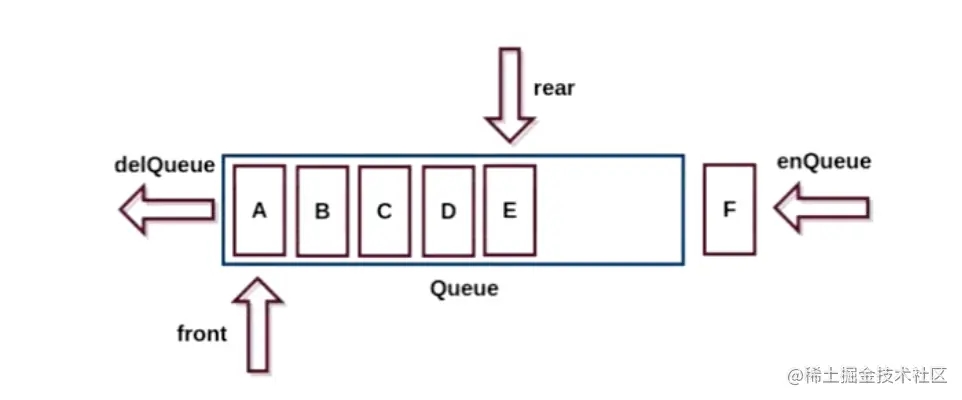
js中没有链表,但可以用Object模拟链表- 链表类似于火车:有一个火车头,火车头会连接一个节点,节点上有乘客(类似于数据),并且这个节点会连接下一个节点,以此类推
链表的火车结构:

链表的常见操作:
append(element):向链表尾部添加一个新的项
insert(value, position):向链表的特定位置插入一个新的项
get(position):获取对应位置的元素
indexOf(element):返回元素在链表中的索引。如果链表中没有该元素则返回 -1
update(position,element):修改某个位置的元素
removeAt(postion):从链表的特定位置移除一项
remove(element):从链表中移除一项
isEmpty():如果链表中不包含任何元素,返回 true,如果链表长度大于等于0返回false
size():返回链表包含的元素个数。与数组的length属性类似
2. 实现链表结构的封装
2.1 基础框架 v1 版
// 1. 创建 Node 节点类
class Node<T> {
  value: T;
  next: Node<T> | null = null;
  constructor(value: T) {
    this.value = value;
  }
}
// 2. 创建 LinkedList 的类
class LinkedList<T> {
  private head: Node<T> | null = null;
  private size: number = 0;
  get length() {
    return this.size;
  }
}
代码解析:
- 封装一个
Node类,用于封装每一个节点上的信息(包括和指向下一个节点的引用),它是一个泛型类 - 封装一个
LinkedList类,用于表示链表结构 - 链表中保存两个属性,
size:链表长度head:链表中的第一个节点
基础的框架搭建好了,我们接下来就来一个个添加方法
2.2 添加 append 方法 v2 版
向 LinkedList 添加 append(element) 方法
append 方法的作用是向链表尾部添加一个新的项
  append(value: T) {
    // 1. 根据 value创建一个新节点
    const newNode = new Node(value)
    // 2. 判断 this.head 是否为 null
    if(!this.head) {
      this.head = newNode
    } else {
      let current = this.head
      while(current.next) {
        current = current.next
      }
      // 此时 current 指向最后一个节点
      current.next = newNode
    }
    // 3. size++
    this.size++
  }
2.3 添加 traverse 方法 v3 版
为了方便可以看到链表上的每一个节点,我们实现一个 traverse 方法
向 LinkedList 添加 traverse 方法
traverse 方法的作用是 遍历链表
  traverse() {
    const values: T[] = [];
    let current = this.head;
    while (current) {
      values.push(current.value);
      current = current.next;
    }
    console.log(values.join("->"));
  }
测试:
const l = new LinkedList<string>();
l.append("第一个节点");
l.append("第二个节点");
l.append("第三个节点");
l.traverse();  // 第一个节点->第二个节点->第三个节点
2.4 添加 insert 方法 v4 版
向 LinkedList 添加 insert(value, position) 方法
insert方法的作用是向链表的特定位置插入一个新的项
  insert(value: T, position: number): boolean {
    // 1. 越界判断
    if (position < 0 || position >= this.size) return false;
    // 2. 根据 value 创建新的节点
    const newNode = new Node(value);
    // 3. 判断是否需要插入头部
    if (position === 0) {
      newNode.next = this.head;
      this.head = newNode;
    } else {
      let current = this.head;
      let previous: Node<T> | null = null;
      let index = 0;
      while (index++ < position && current) {
        previous = current;
        current = current.next;
      }
      // index === position
      newNode.next = current;
      previous!.next = newNode;
    }
    return true;
  }
测试:
const l = new LinkedList<string>();
l.append("aaa");
l.append("bbb");
l.append("ccc");
// l.insert("ddd", 0); // 插入头部位置 ddd->aaa->bbb->ccc
// l.insert("ddd", 2); // 插入第二个位置  aaa->bbb->ddd->ccc
// l.insert("ddd", 3); // 插入尾部 aaa->bbb->ccc->ddd
l.traverse();
2.5 添加 removeAt 方法 v5 版
向 LinkedList 添加 removeAt(postion) 方法
removeAt方法的作用是从链表的特定位置移除一项
  removeAt(position: number): T | null {
    // 1. 越界判断
    if (position < 0 || position > this.size) return null;
    // 2. 判断是否删除第一个节点
    let current = this.head;
    if (position === 0) {
      this.head = current?.next ?? null;
    } else {
      let previous: Node<T> | null = null;
      let index = 0;
      while (index++ < position && current) {
        previous = current;
        current = current.next;
      }
      previous!.next = current?.next ?? null;
    }
    this.size--;
    return current?.value ?? null;
  }
测试:
const l = new LinkedList<string>();
l.append("aaa");
l.append("bbb");
l.append("ccc");
// console.log(l.removeAt(0)); // aaa
// console.log(l.removeAt(1)); // bbb
// console.log(l.removeAt(2)); // ccc
// console.log(l.removeAt(3)); // null
l.traverse();
2.6 添加 get 方法 v6 版
向 LinkedList 添加 get(postion) 方法
get方法的作用是获取对应位置的元素
  get(position: number): T | null {
    // 越界问题
    if (position < 0 || position >= this.size) return null;
    // 2. 查找元素
    let index = 0;
    let current = this.head;
    while (index++ < position && current) {
      current = current?.next;
    }
    // index === position
    return current?.value ?? null;
  }
测试:
const l = new LinkedList<string>();
l.append("aaa");
l.append("bbb");
l.append("ccc");
console.log(l.get(0)); // aaa
console.log(l.get(1)); // bbb
console.log(l.get(2)); // ccc
console.log(l.get(3)); // null
2.7 添加 getNode 方法 v7 版
到这里,我们发现上面的代码在 通过 position 获取节点的逻辑 上有很多重复的地方,现在我们通过添加 getNode 方法来重构一下
向 LinkedList 添加 getNode(postion) 私有方法
getNode方法的作用是获取对应位置的节点
  // 封装私有方法
  // 根据 position 获取得到当前的节点
  private getNode(position: number): Node<T> | null {
    let index = 0;
    let current = this.head;
    while (index++ < position && current) {
      current = current?.next;
    }
    return current;
  }
有了这个方法,我们就可以对 get removeAt insert 方法进行重构了
- 对
removeAt进行重构
  removeAt(position: number): T | null {
    // 1. 越界判断
    if (position < 0 || position > this.size) return null;
    // 2. 判断是否删除第一个节点
    let current = this.head;
    if (position === 0) {
      this.head = current?.next ?? null;
    } else {
-      let previous: Node<T> | null = null;
-      let index = 0;
-
-      while (index++ < position && current) {
-        previous = current;
-        current = current.next;
-      }
-      previous!.next = current?.next ?? null;
+      let previous = this.getNode(position - 1);
+      current = previous?.next ?? null;
+      previous!.next = previous?.next?.next ?? null;
    }
    this.size--;
    return current?.value ?? null;
  }
- 对
get进行重构
  get(position: number): T | null {
    // 越界问题
    if (position < 0 || position >= this.size) return null;
    // 2. 查找元素
-    let index = 0;
-    let current = this.head;
-    while (index++ < position && current) {
-      current = current?.next;
-    }
+    let current = this.getNode(position);
    return current?.value ?? null;
  }
- 对
insert进行重构
  insert(value: T, position: number): boolean {
    // 1. 越界判断
    if (position < 0 || position > this.size) return false;
    // 2. 根据 value 创建新的节点
    const newNode = new Node(value);
    // 3. 判断是否需要插入头部
    if (position === 0) {
      newNode.next = this.head;
      this.head = newNode;
    } else {
-      let current = this.head;
-      let previous: Node<T> | null = null;
-      let index = 0;
-
-      while (index++ < position && current) {
-        previous = current;
-        current = current.next;
-      }
-
-      // index === position
-      newNode.next = current;
-      previous!.next = newNode;
+      const previous = this.getNode(position - 1);
+      newNode.next = previous?.next ?? null;
+      previous!.next = newNode;
    }
    return true;
  }
测试一把,都没问题
const l = new LinkedList<string>();
l.append("aaa");
l.append("bbb");
l.append("ccc");
// console.log(l.removeAt(0)); // aaa
// console.log(l.removeAt(1)); // bbb
// console.log(l.removeAt(2)); // ccc
// console.log(l.removeAt(3)); // null
// console.log(l.get(0)) // aaa
// console.log(l.get(1)) // bbb
// console.log(l.get(2)) // ccc
// console.log(l.get(3)) // null
// l.insert("ddd", 0); // ddd->aaa->bbb->ccc
// l.insert("ddd", 1); // aaa->ddd->bbb->ccc
// l.insert("ddd", 2); // aaa->bbb->ddd->ccc
// l.insert("ddd", 3); // aaa->bbb->ccc->ddd
// l.insert("ddd", 4); // aaa->bbb->ccc
l.traverse();
2.8 添加 update 方法 v8 版
向 LinkedList 添加 update(position,element) 方法
update方法的作用是修改某个位置的元素
  update(value: T, position: number):boolean {
    if (position < 0 || position >= this.size) return false;
    // 获取对应位置的节点,直接更新即可
    const currentNode = this.getNode(position)
    currentNode!.value = value
    return true
  }
测试:
const l = new LinkedList<string>();
l.append("aaa");
l.append("bbb");
l.append("ccc");
l.traverse(); // aaa->bbb->ccc
l.update("ddd", 1); // aaa->ddd->ccc
l.traverse();
2.9 添加 indexOf 方法 v9 版
向 LinkedList 添加 indexOf(element) 方法
indexOf方法的作用是返回元素在链表中的索引。如果链表中没有该元素则返回 -1
  indexOf(value: T) {
    // 从第一个节点开始,向后遍历
    let current = this.head;
    let index = 0;
    while (current) {
      if (current.value === value) {
        return index;
      }
      current = current.next;
      index++;
    }
    return -1;
  }
测试:
const l = new LinkedList<string>();
l.append("aaa");
l.append("bbb");
l.append("ccc");
console.log(l.indexOf("aaa"));
console.log(l.indexOf("bbb"));
console.log(l.indexOf("ccc"));
2.10 添加 remove 方法 v10 版
向 LinkedList 添加 remove(element) 方法
remove方法的作用是从链表中移除一项
  remove(value: T): T | null {
    const index = this.indexOf(value);
    return this.removeAt(index);
  }
测试:
const l = new LinkedList<string>();
l.append("aaa");
l.append("bbb");
l.append("ccc");
l.remove('bbb')
l.traverse() // aaa->ccc
2.11 添加方法 isEmpty v11 版
向 LinkedList 添加 isEmpty() 方法
isEmpty方法的作用是如果链表中不包含任何元素,返回 true,如果链表长度大于等于 0 返回 false
  isEmpty(): boolean {
    return this.size === 0;
  }
3. 面试题一:设计链表
这是 Leetcode 上的第 707 道题,难度为:中等
3.1 题目描述
设计链表的实现。您可以选择使用单链表或双链表。单链表中的节点应该具有两个属性:val 和 next。val 是当前节点的值,next 是指向下一个节点的指针/引用。如果要使用双向链表,则还需要一个属性 prev 以指示链表中的上一个节点。假设链表中的所有节点都是 0-index 的。
在链表类中实现这些功能:
get(index):获取链表中第index个节点的值。如果索引无效,则返回-1。addAtHead(val):在链表的第一个元素之前添加一个值为val的节点。插入后,新节点将成为链表的第一个节点。addAtTail(val):将值为val的节点追加到链表的最后一个元素。addAtIndex(index,val):在链表中的第index个节点之前添加值为val的节点。如果index等于链表的长度,则该节点将附加到链表的末尾。如果index大于链表长度,则不会插入节点。如果index小于0,则在头部插入节点。deleteAtIndex(index):如果索引index有效,则删除链表中的第index个节点。
示例:
MyLinkedList linkedList = new MyLinkedList();
linkedList.addAtHead(1);
linkedList.addAtTail(3);
linkedList.addAtIndex(1,2);   //链表变为1-> 2-> 3
linkedList.get(1);            //返回2
linkedList.deleteAtIndex(1);  //现在链表是1-> 3
linkedList.get(1);            //返回3
提示:
0 <= index, val <= 1000- 请不要使用内置的
LinkedList库。 get,addAtHead,addAtTail,addAtIndex和deleteAtIndex的操作次数不超过2000。
3.2 解答
这道题的答案在第二章就已经给出了,我们只需要进行一些修改即可
class Node {
  value: number;
  next: Node | null = null;
  constructor(value: number) {
    this.value = value;
  }
}
class MyLinkedList {
  private head: Node | null = null;
  private size: number = 0;
  constructor() {}
  private getNode(position: number): Node | null {
    let index = 0;
    let current = this.head;
    while (index++ < position && current) {
      current = current?.next;
    }
    return current;
  }
  get(index: number): number {
    if (index < 0 || index >= this.size) return -1;
    let current = this.getNode(index);
    return current!.value;
  }
  addAtHead(val: number): void {
    const newNode = new Node(val);
    if (!this.head) {
      this.head = newNode;
    } else {
      newNode.next = this.head;
      this.head = newNode;
    }
    this.size++;
  }
  addAtTail(val: number): void {
    const newNode = new Node(val);
    if (!this.head) {
      this.head = newNode;
    } else {
      let current = this.getNode(this.size - 1);
      current!.next = newNode;
    }
    this.size++;
  }
  addAtIndex(index: number, val: number): void {
    if (index > this.size) return;
    if (index <= 0) {
      this.addAtHead(val);
    } else {
      const newNode = new Node(val);
      const previous = this.getNode(index - 1);
      newNode.next = previous?.next ?? null;
      previous!.next = newNode;
    }
    this.size++;
  }
  deleteAtIndex(index: number): void {
    if (index < 0 || index >= this.size) return;
    let current = this.head;
    if (index === 0) {
      this.head = current?.next ?? null;
    } else {
      const previous = this.getNode(index - 1);
      previous!.next = previous?.next?.next ?? null;
    }
    this.size--;
  }
}
复杂度分析:
时间复杂度:
初始化消耗 O(1)
get 消耗 O(index)
addAtHead 消耗 O(1)
addAtTail 消耗 O(n),其中 n 为链表当前长度
addAtIndex 消耗 O(index)
deleteAtIndex 消耗 O(index - 1)
- 空间复杂度:所有函数的单词调用空间复杂度均为
O(1),总体空间复杂度为O(n),
4. 面试题二:删除链表中的节点
这是 Leetcode 上的第 237 道题,难度为:中等
4.1 题目描述
有一个单链表的 head,我们想删除它其中的一个节点 node。
给你一个需要删除的节点 node 。你将 无法访问 第一个节点 head。
链表的所有值都是 唯一的,并且保证给定的节点 node 不是链表中的最后一个节点。
删除给定的节点。注意,删除节点并不是指从内存中删除它。这里的意思是:
- 给定节点的值不应该存在于链表中。
- 链表中的节点数应该减少 1。
node前面的所有值顺序相同。node后面的所有值顺序相同。
自定义测试:
- 对于输入,你应该提供整个链表
head和要给出的节点node。node不应该是链表的最后一个节点,而应该是链表中的一个实际节点。 - 我们将构建链表,并将节点传递给你的函数。
- 输出将是调用你函数后的整个链表。
示例 1:
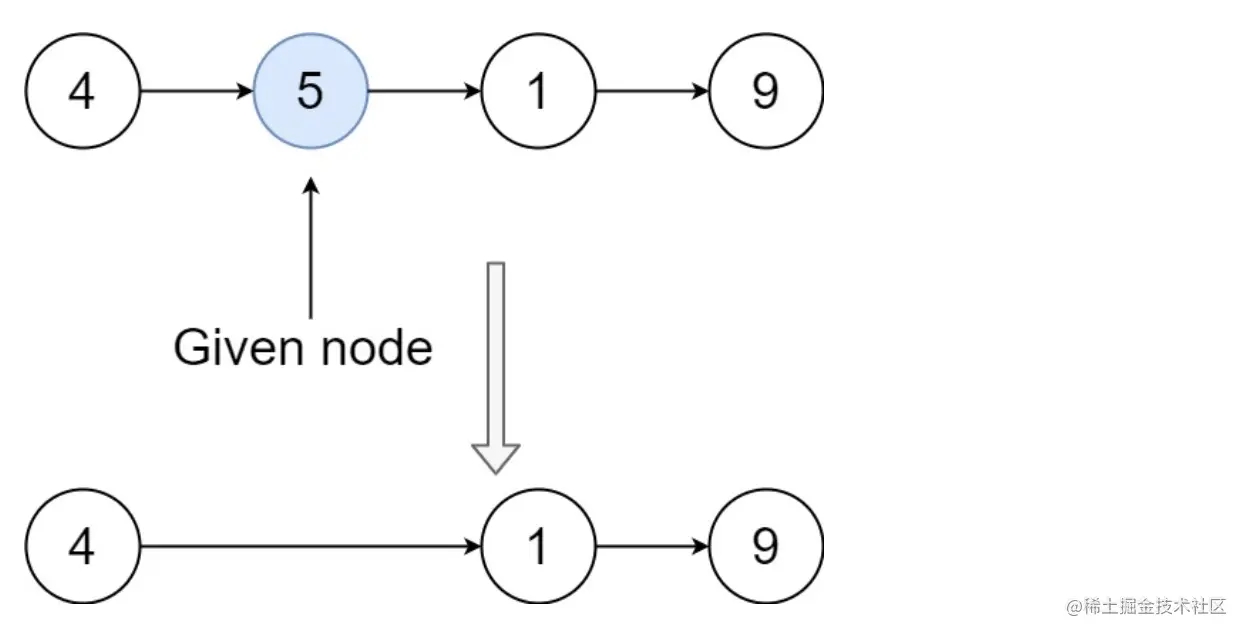
输入: head = [4,5,1,9], node = 5
输出: [4,1,9]
解释: 指定链表中值为 5 的第二个节点,那么在调用了你的函数之后,该链表应变为 4 -> 1 -> 9
示例 2:
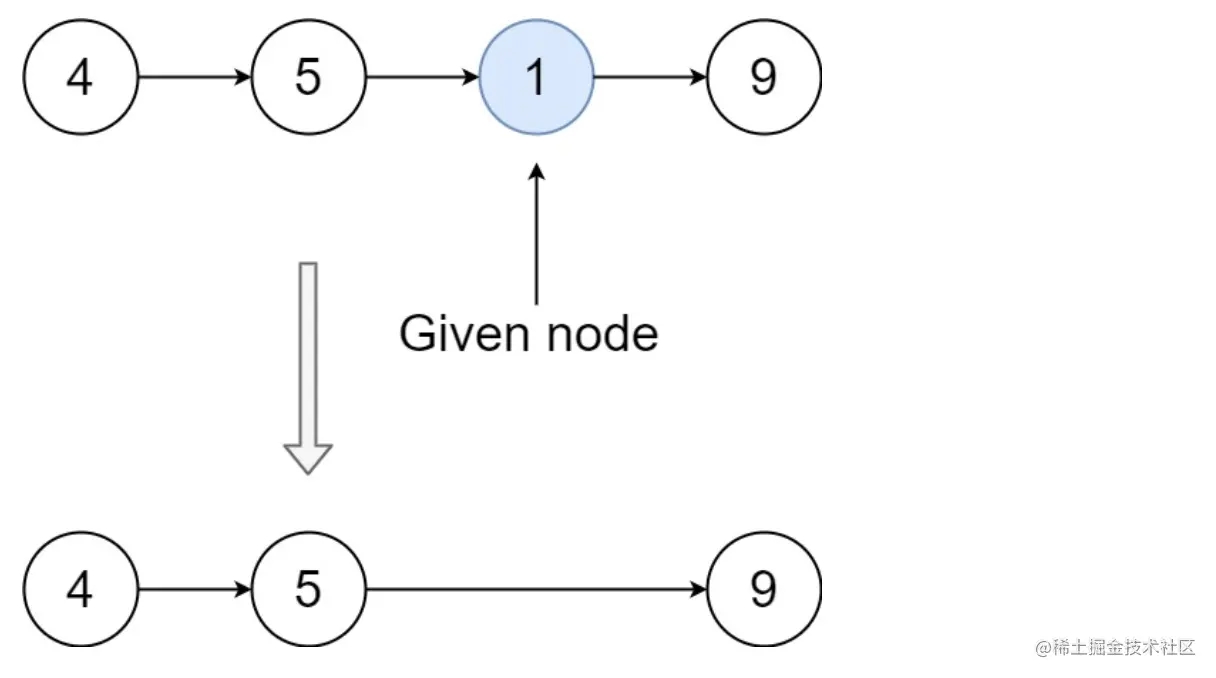
输入: head = [4,5,1,9], node = 1
输出: [4,5,9]
解释: 指定链表中值为 1 的第三个节点,那么在调用了你的函数之后,该链表应变为 4 -> 5 -> 9
提示:
- 链表中节点的数目范围是
[2, 1000] -1000 <= Node.val <= 1000- 链表中每个节点的值都是 唯一 的
- 需要删除的节点
node是 链表中的节点 ,且 不是末尾节点
4.2 解答
删除节点的操作我们其实之前就已经实现了的,我们只要拿到要删除节点的前一个节点,将前一个节点的 next 指向要删除节点的下一个节点即可。 但是这道题有一个问题就是,我们拿不到要删除前点的上一个节点。
思路:
我们可以将要删除的节点的值赋值成它的下一个节点就行了,这样就将问题从删除某个节点转换成了删除某个节点的后一个节点,这样的好处就是我们能拿到要删除节点的前一个节点。
/**
 * Definition for singly-linked list.
 * class ListNode {
 *     val: number
 *     next: ListNode | null
 *     constructor(val?: number, next?: ListNode | null) {
 *         this.val = (val===undefined ? 0 : val)
 *         this.next = (next===undefined ? null : next)
 *     }
 * }
 */
/**
 Do not return anything, modify it in-place instead.
 */
function deleteNode(node: ListNode | null): void {
  node.val = node.next.val;
  node.next = node.next.next;
}
复杂度分析
- 时间复杂度:
O(1)。 - 空间复杂度:
O(1)。
5. 面试题三:反转链表
这是 Leetcode 上的第 206 道题,难度为:中等
5.1 解一:栈结构
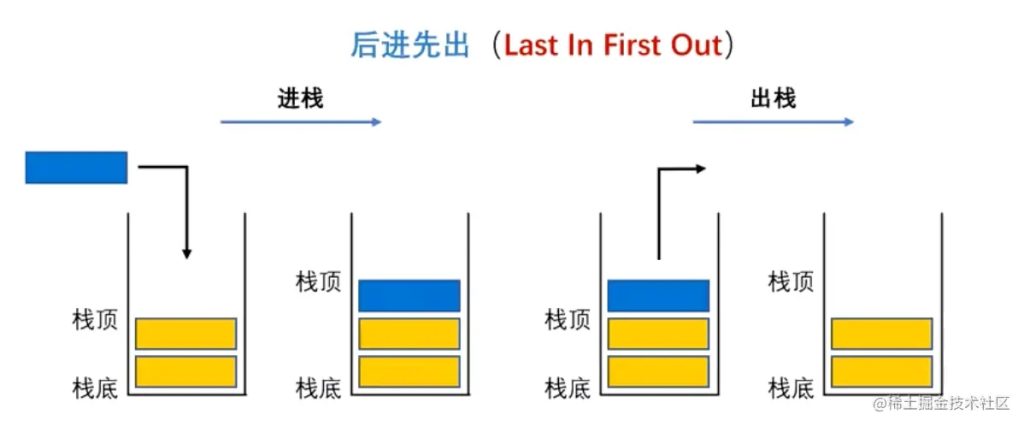
这道题可以用栈来解决,利用栈的 后进先出 的特性。
思路:先依次将数据 push 进栈中,再一次从栈中 pop 出数据,拼接 pop 出来的元素成一个新的链表。
function reverseList(head: ListNode | null): ListNode | null {
  // head 本身为 null 时 不需要处理
  if (head === null) return null;
  // 只有一个节点
  if (!head.next) return head;
  // 数组模拟栈结构
  const stack: ListNode[] = [];
  let current: ListNode | null = head;
  while (current) {
    stack.push(current);
    current = current.next;
  }
  // 依次从栈结构中取出元素,放到一个新的链表中
  const newHead: ListNode = stack.pop()!
  let newHeadCurrent = newHead
  while(stack.length) {
    const node = stack.pop()!
    newHeadCurrent.next = node
    newHeadCurrent = newHeadCurrent.next
  }
  newHeadCurrent.next = null
  return newHead
}
复杂度分析:
- 时间复杂度:
O(2n),n为链表的长度,因为要遍历两次链表 - 空间复杂度:
O(n),额外需要使用栈这种结构
5.2 解二:迭代
假设链表为 1 ️ 2 ️ 3 ️ 4 ️ ∅,我们想要把它改成 ∅ ⬅️ 1 ⬅️ 2 ⬅️ 3 ⬅️ 4
思路:在遍历链表时,将当前节点的 next 指针改为指向前一个节点。由于节点没有引用其前一个节点,因此必须事先存储其前一个节点。在更改引用之前,还需要存储后一个节点。最后返回新的头引用。
function reverseList(head: ListNode | null): ListNode | null {
  // 1. 判断节点为 null,或者只要一个节点,那么直接返回即可
  if (head === null || head.next === null) return head;
  // 2. 反转链表结构
  let newHead: ListNode | null = null
  while(head) {
    const current: ListNode | null = head.next
    head.next = newHead
    newHead = head
    head = current
  }
  return newHead
}
复杂度分析
- 时间复杂度:
O(n),其中n是链表的长度。需要遍历链表一次。 - 空间复杂度:
O(1)。
5.3 解三:递归
递归版本稍微复杂一些,其关键在于反向工作。
思路:
假如我们有一个链表 1 -> 2 -> 3 -> 4
如果我们想反转 1 <- 2 就必须先将反转 2 <- 3,因为如果我们将 1 -> 2 反转成 1 <- 2 后,那么 2 后边的节点就再也拿不到了。按照上面的逻辑递归,我们需要先将最后的 3 -> 4 反转成 3 <- 4 在反转前面的节点。
function reverseList(head: ListNode | null): ListNode | null {
  // 1. 判断节点为 null,或者只要一个节点,那么直接返回即可
  if (head === null || head.next === null) {
    return head
  };
  const newHead = reverseList(head.next);
  head.next.next = head;
  head.next = null;
  return newHead;
}
复杂度分析:
- 时间复杂度:
O(n),其中n是链表的长度。需要对链表的每个节点进行反转操作。 - 空间复杂度:
O(n),其中n是链表的长度。空间复杂度主要取决于递归调用的栈空间,最多为n层。
以上就是TypeScript数据结构链表结构 LinkedList教程及面试的详细内容,更多关于TypeScript 链表结构的资料请关注脚本之家其它相关文章!
来源链接:https://www.jb51.net/article/274317.htm
如有侵犯您的版权,请及时联系3500663466#qq.com(#换@),我们将第一时间删除本站数据。


暂无评论内容