


一、背景介绍
1.1 爬取目标
用python开发的爬虫采集软件,可自动按指定博主抓取该博主已发布笔记。
为什么有了源码还开发界面软件呢?方便不懂编程代码的小白用户使用,无需安装python,无需改代码,双击打开即用!
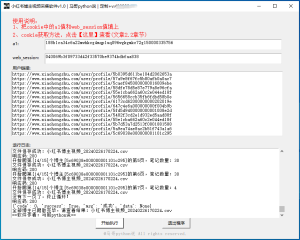
软件界面截图:

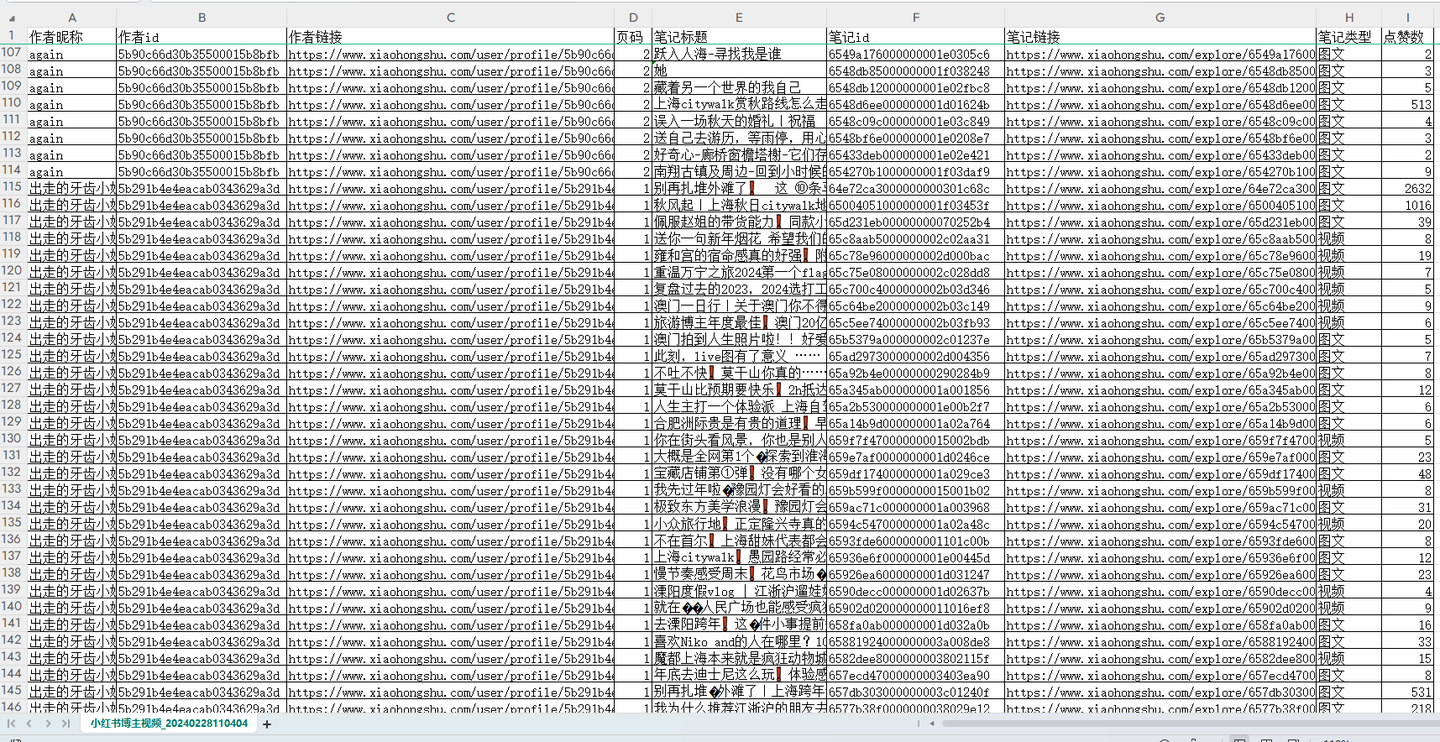
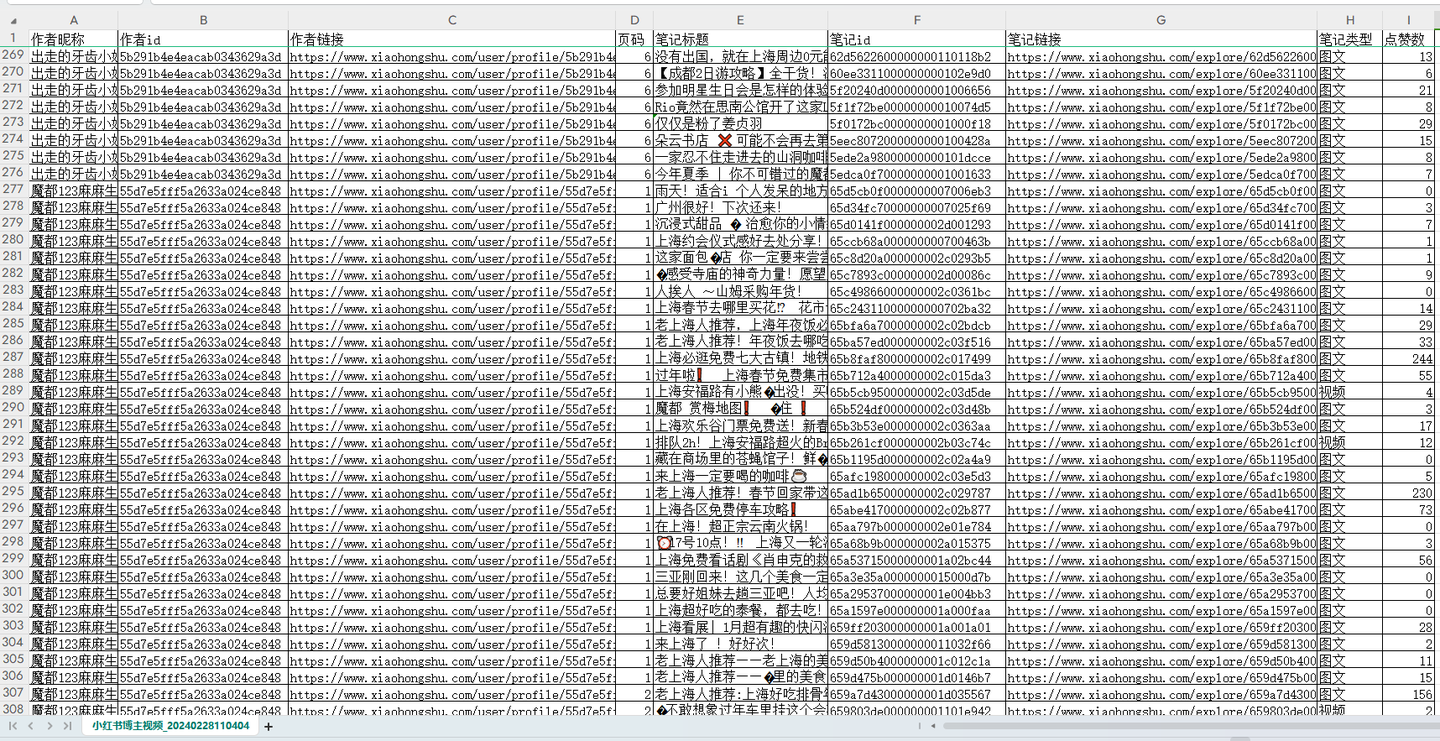
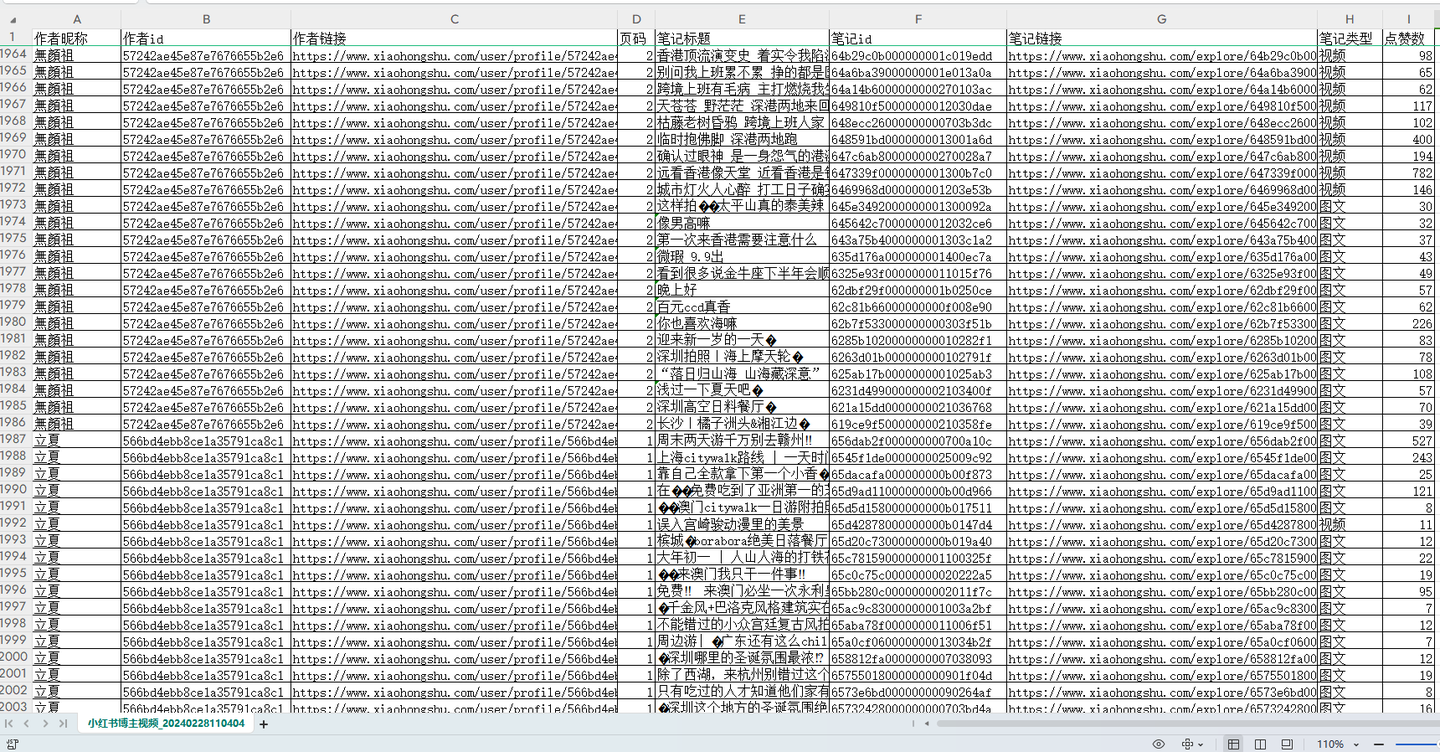
爬取结果截图:
结果截图1:
结果截图2:
结果截图3:
以上。
1.2 演示视频
软件使用演示:
见原文
1.3 软件说明
几点重要说明: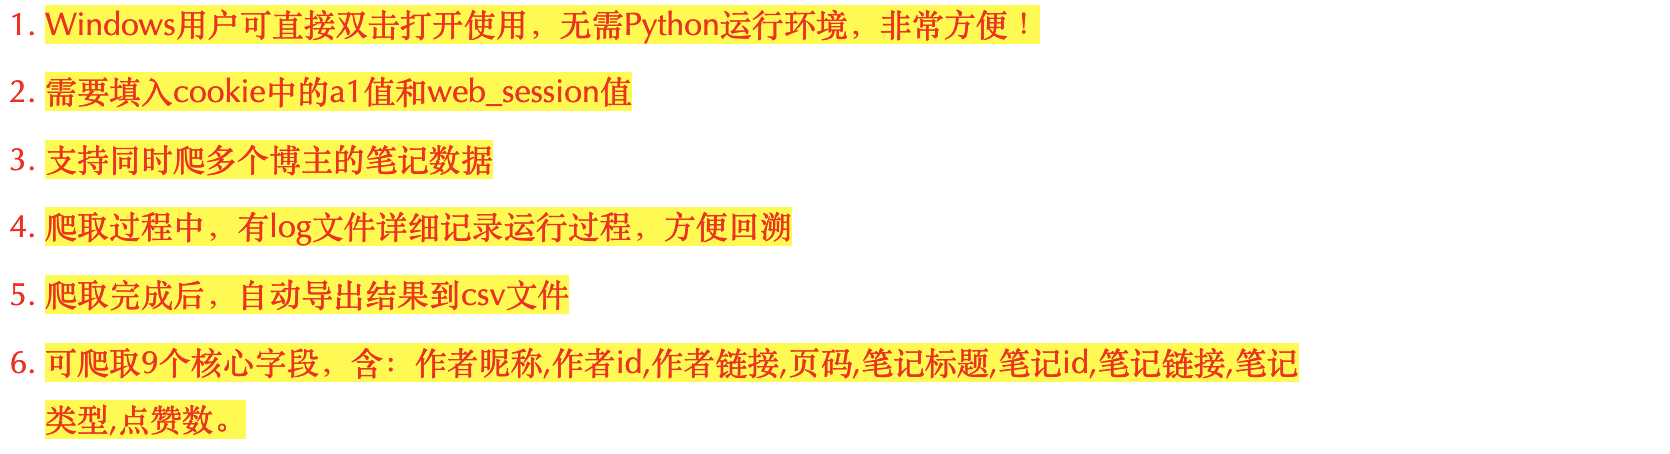
以上。
二、代码讲解
2.1 爬虫采集模块
首先,定义接口地址作为请求地址:
# 请求地址
posted_url = 'https://edith.xiaohongshu.com/api/sns/web/v1/user_posted'
定义一个请求头,用于伪造浏览器:
# 请求头
h1 = {
	"Content-Type": "application/json; charset=utf-8",
	"Accept": "application/json, text/plain, */*",
	"Accept-Language": "zh-CN,zh;q=0.9",
	"Origin": "https://www.xiaohongshu.com",
	"Referer": "https://www.xiaohongshu.com/",
	"User-Agent": "Mozilla/5.0 (Windows NT 10.0; Win64; x64) AppleWebKit/537.36 (KHTML, like Gecko) Chrome/120.0.0.0 Safari/537.36",
	"Connection": "keep-alive",
	"Cookie": "gid=yYDqDJSjjy7dyYDqDJSqDv8iydu4WMhDIKxCvVfJJ3FkTJq836EFDT888jyKJK28id4dYD42; sec_poison_id=9473b193-aa0e-436e-848a-c53f539ae316; webBuild=4.2.1; websectiga=f47eda31ec99545da40c2f731f0630efd2b0959e1dd10d5fedac3dce0bd1e04d; xsecappid=xhs-pc-web; web_session={}; customer-sso-sid=65a493817900000000000011; x-user-id-pgy.xiaohongshu.com=642651810000000011022ed2; customerClientId=171221914380812; a1={}; webId=e9a9990ce615eec84d0fd8a2f4e9e29d; abRequestId=7c4f00be-699b-57f5-81c9-2783ff470960".format(
		self.web_session, self.a1),
}
说明一下,cookie是个关键参数。
其中,cookie里的a1和web_session获取方法,如下:
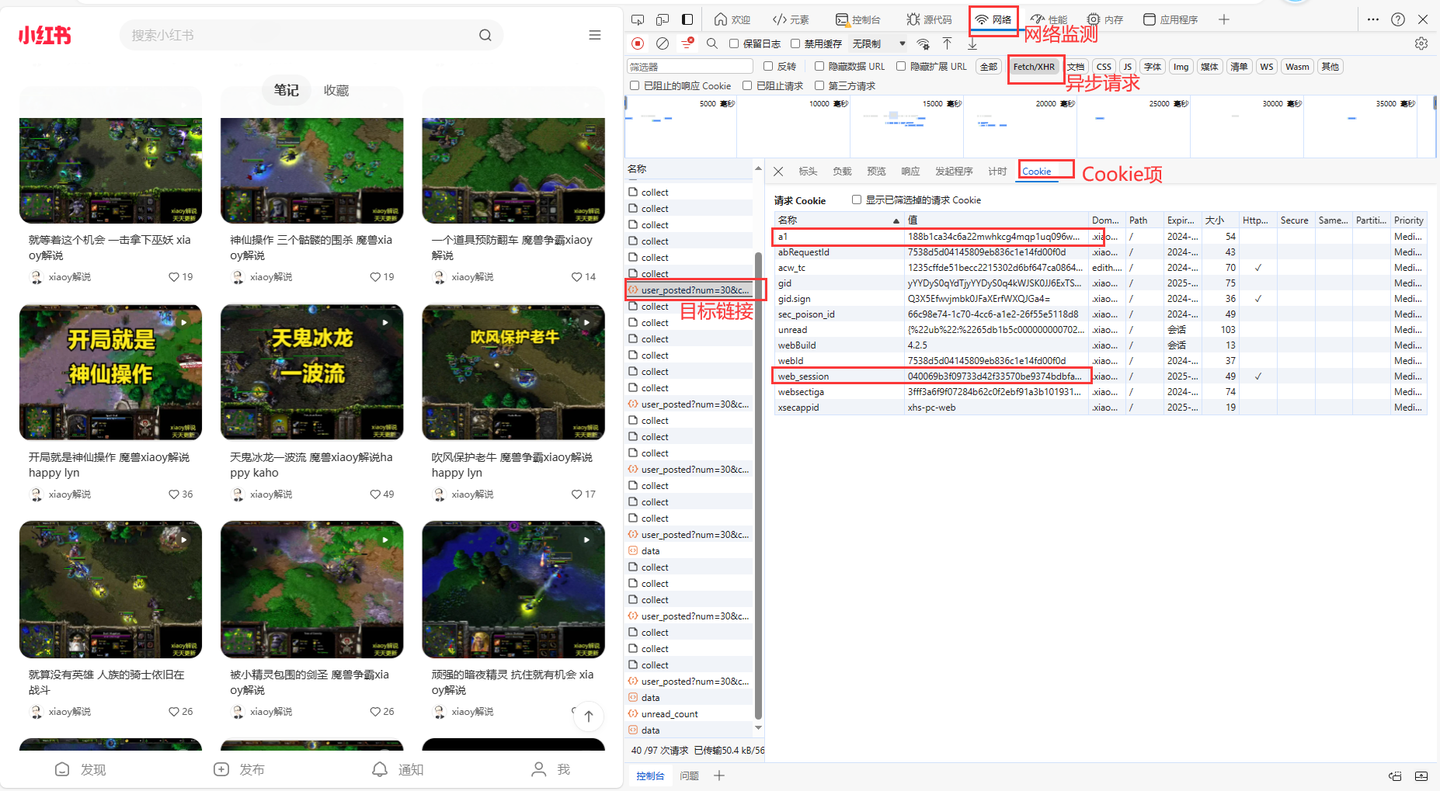
这两个值非常重要,软件界面需要填写!!
加上请求参数,告诉程序你的爬取条件是什么:
# 请求参数
params = {
	"num": 30,
	"cursor": next_cursor,
	"user_id": user_id,
	"image_scenes": ""
}
下面就是发送请求和接收数据:
# 发送请求
r = requests.post(posted_url, headers=h1, params=params)
# 接收数据
json_data = r.json()
逐个解析字段数据,以”笔记标题”为例:
# 笔记标题
title = i['display_title']
title_list.append(title)
其他字段同理,不再赘述。
保存数据到Dataframe中:
# 保存数据到DF
df = pd.DataFrame(
	{
		'作者昵称': author_name_list,
		'作者id': author_id_list,
		'作者链接': ['https://www.xiaohongshu.com/user/profile/' + str(i) for i in author_id_list],
		'页码': page,
		'笔记标题': title_list,
		'笔记id': note_id_list,
		'笔记链接': note_url_list,
		'笔记类型': note_type_list,
		'点赞数': likes_list,
	}
)
最后,再把数据保存到csv文件:
# 设置csv文件表头
if os.path.exists(self.result_file):
	header = False
else:
	header = True
# 保存到csv
df.to_csv(self.result_file, mode='a+', header=header, index=False, encoding='utf_8_sig')
self.tk_show('文件保存成功:' + self.result_file)
完整代码中,还含有:判断循环结束条件、转换时间戳、js逆向解密等关键实现逻辑,详见文末。
2.2 软件界面模块
主窗口部分:
# 创建主窗口
root = tk.Tk()
root.title('小红书博主笔记采集软件v1.0 | 马哥python说 |')
# 设置窗口大小
root.minsize(width=850, height=650)
输入控件部分:
# a1填写
tk.Label(root, justify='left', text='a1:').place(x=30, y=80)
entry_a1 = tk.Text(root, bg='#ffffff', width=96, height=2, )
entry_a1.place(x=125, y=80, anchor='nw')  # 摆放位置
# web_session填写
tk.Label(root, justify='left', text='web_session:').place(x=30, y=120)
entry_web_session = tk.Text(root, bg='#ffffff', width=96, height=2, )
entry_web_session.place(x=125, y=120, anchor='nw')  # 摆放位置
底部版权部分:
# 版权信息
copyright = tk.Label(root, text='@马哥python说 All rights reserved.', font=('仿宋', 10), fg='grey')
copyright.place(x=290, y=625)
以上。
2.3 日志模块
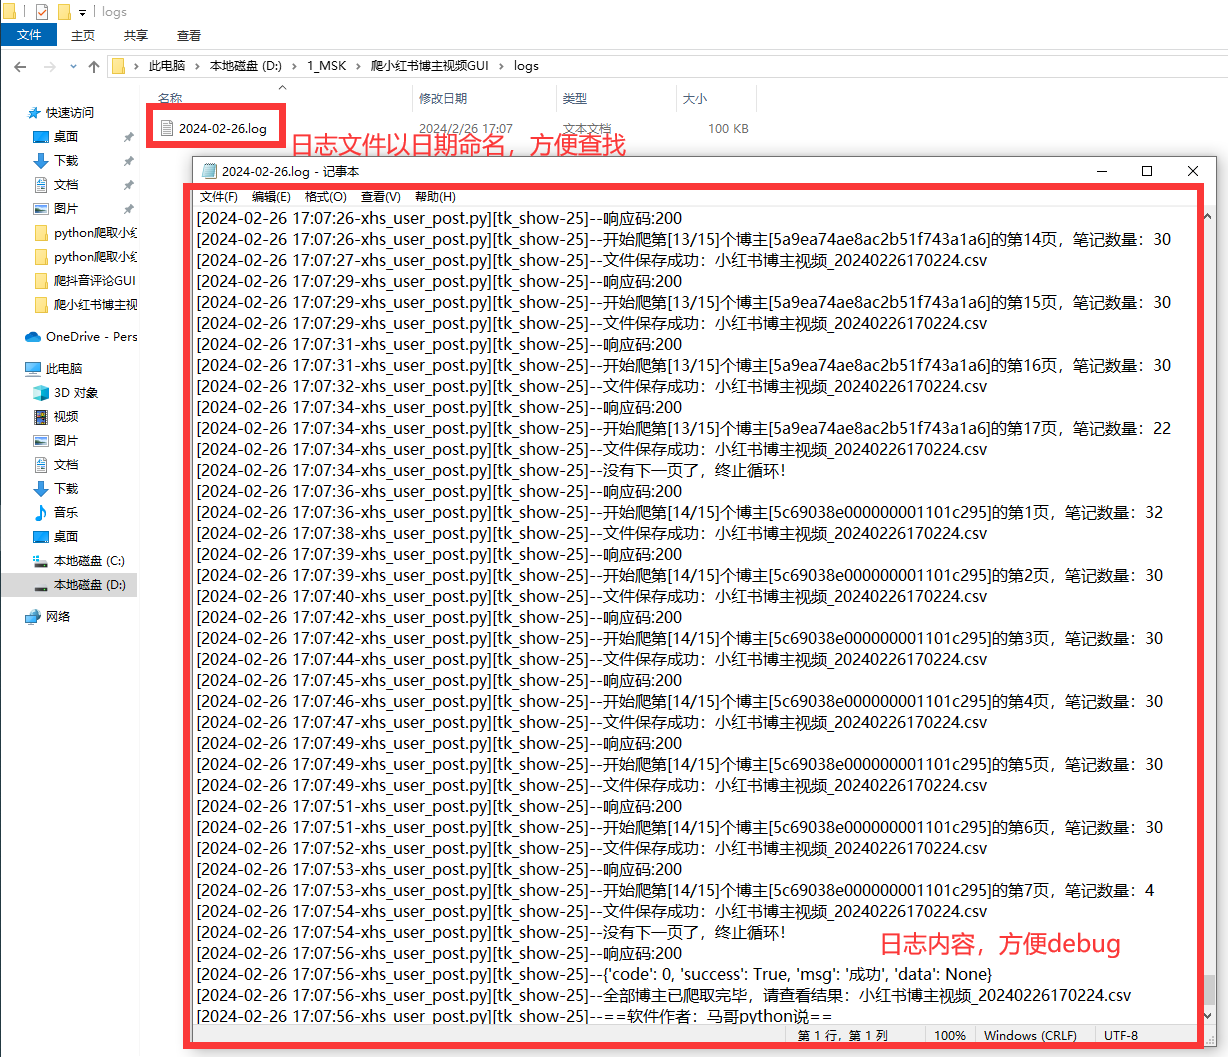
好的日志功能,方便软件运行出问题后快速定位原因,修复bug。
核心代码:
def get_logger(self):
	self.logger = logging.getLogger(__name__)
	# 日志格式
	formatter = '[%(asctime)s-%(filename)s][%(funcName)s-%(lineno)d]--%(message)s'
	# 日志级别
	self.logger.setLevel(logging.DEBUG)
	# 控制台日志
	sh = logging.StreamHandler()
	log_formatter = logging.Formatter(formatter, datefmt='%Y-%m-%d %H:%M:%S')
	# info日志文件名
	info_file_name = time.strftime("%Y-%m-%d") + '.log'
	# 将其保存到特定目录
	case_dir = r'./logs/'
	info_handler = TimedRotatingFileHandler(filename=case_dir + info_file_name,
										when='MIDNIGHT',
										interval=1,
										backupCount=7,
										encoding='utf-8')
日志文件截图:
以上。
三、转载声明
转载已获原作者 @马哥python说 授权:
博客园原文链接: 【GUI软件】小红书指定博主批量采集笔记,支持多博主同时采集!
© 版权声明
本站所有资源来自于网络,仅供学习与参考,请勿用于商业用途,否则产生的一切后果将由您(转载者)自己承担!
如有侵犯您的版权,请及时联系3500663466#qq.com(#换@),我们将第一时间删除本站数据。
如有侵犯您的版权,请及时联系3500663466#qq.com(#换@),我们将第一时间删除本站数据。
THE END


暂无评论内容