

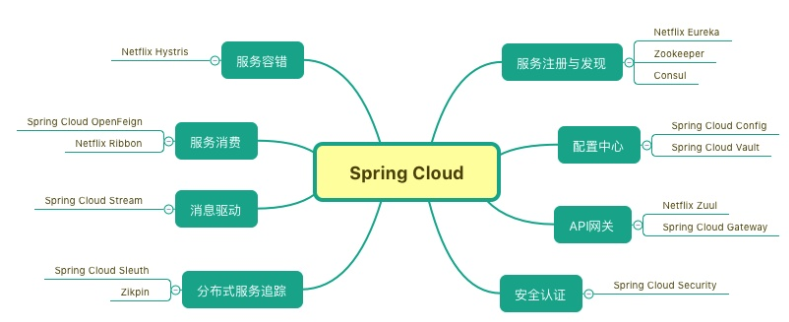
准备工作
1. 获取API Key
首先,您需要在DeepSeek官网注册账号并创建一个项目来获取API Key。这个Key将用于验证您的请求。
2. 安装依赖
确保你的Node.js环境已准备就绪,并安装以下npm包:
npm install axios express http
实现步骤
1. 创建Express服务器
我们将使用Express框架快速搭建一个HTTP服务器。以下是基本设置代码片段:
const express = require('express');
const app = express();
app.use(express.json());
// 定义主机名和端口
const hostname = '127.0.0.1';
const port = 3002;
2. 配置CORS中间件
为了允许跨域请求,我们需要添加CORS支持:
app.all('*', function (req, res, next) {
  // CORS headers setup...
  res.header('Access-Control-Allow-Origin', '*'); // 允许任意域名发起跨域请求
  res.header('Access-Control-Allow-Headers', 'Content-Type, Content-Length, Authorization, Accept, X-Requested-With'); // 允许指定的头部字段
  res.header('Access-Control-Allow-Methods', 'PUT, POST, GET, DELETE, OPTIONS'); // 允许指定的 HTTP 方法
  res.header('X-Powered-By', '3.2.1'); // 添加自定义头部信息

  if ('OPTIONS' == req.method) { // 如果请求方法是 OPTIONS,则直接返回成功响应
    res.send(200);
  } else { // 否则继续处理请求
    next();
  }
});
3. 定义路由处理函数
接下来,定义处理/chat/completions请求的路由,这里我们采用流式响应方式处理数据返回:
router.get('/chat/completions', async (req, res) => {
  let messages = [{ role: "user", content: req.query.mesage}]
  let { config } = await createChatCompletion(messages)
  let response = await axios(config)
  res.setHeader('Content-Type', 'text/event-stream');
  res.setHeader('Cache-Control', 'no-cache');
  res.setHeader('Connection', 'keep-alive');
  // 处理流式响应
  response.data.on('data', async (chunk) => {
    const lines = chunk.toString().split('\n'); // 将数据块转换为字符串并按行分割
    for (const line of lines) {
      if (line.trim() === '') continue; // 跳过空行
      if (line.trim() === 'data: [DONE]') continue; // 跳过结束标记
      if (line.startsWith('data:')) { // 检查是否以 "data: " 开头
        try {
          const json = JSON.parse(line.slice(6)); // 去掉前缀 "data: " 并解析 JSON
          if (json.choices[0].delta.content) { // 检查是否有内容
            let contents = []
            let index = 0
            contents.push(json.choices[0].delta.content)
            for (let i = 0; i < contents.length; i++) {
              setTimeout(() => {
                res.write(`data: ${JSON.stringify({ content: contents[index] })}\n\n`);
                index++
              }, 200);
            }
          }
        } catch (e) {
          continue; // 如果解析失败,继续处理下一行
        }
      }
    }
  });

  // 处理逻辑...
});
4. 调用DeepSeek API
编写辅助函数createChatCompletion来构造请求参数并调用DeepSeek API:
async function createChatCompletion(messages) {
  const data = JSON.stringify({
    "messages": messages,
    "model": "deepseek-reasoner",
    "response_format": {"type":"text"},
    "stream": true,
  });

  let config = {
    method: 'post',
    url: 'https://api.deepseek.com/chat/completions',
    headers: {
      'Content-Type': 'application/json',
      'Authorization': `Bearer YOUR_API_KEY`,
    },
    responseType: "stream",
    data: data
  };

  return {config};
}
请记得替换YOUR_API_KEY为您的实际API密钥。
5. 启动服务器
最后,启动Express服务器监听指定端口:
app.listen(PORT, HOSTNAME, () => {
  console.log(`Server running at http://${HOSTNAME}:${PORT}/`);
});
前端处理
Server-Sent Events(SSE)是一种用于实现服务器向客户端单向推送数据的技术。使用了 SSE 来实现客户端与服务器之间的实时通信。
<!DOCTYPE html>
<html lang="en">
<head>
<meta charset="UTF-8">
<title>Server-Sent Events Example</title>
</head>
<body>
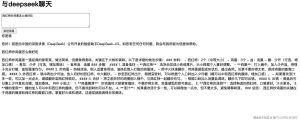
<h1>与deepseek聊天</h1>
<div>
<textarea id="userInput" placeholder="输入你的消息..." rows="4" cols="50"></textarea><br />
<button onclick="sendMessage()">发送消息</button>
</div>
<div id="messages">
<!-- 服务器返回的消息将显示在这里 -->
</div>
<script>
function sendMessage () {
const responseArea = document.getElementById('messages');
const userInput = document.getElementById('userInput').value;
let p = document.createElement('p')
const div = document.createElement('div')
div.classList = 'title'
div.innerHTML = userInput
responseArea.appendChild(div)
if (!userInput) return;
// 创建一个新的 EventSource 对象
const eventSource = new EventSource(`http://127.0.0.1:3002/chat/completions?mesage=${userInput}`);
// 监听 'message' 事件,每当服务器推送一条新消息时触发
eventSource.onmessage = function (event) {
try {
const json = JSON.parse(event.data);
updateResponseArea(json.content, p);
} catch (e) {
console.error('Error parsing JSON:', e);
}
};
// 监听 'open' 事件,表示连接已成功打开
eventSource.onopen = function () {
console.log('Connection to server opened.');
};
// 监听 'error' 事件,处理任何错误或连接中断的情况
eventSource.onerror = function (error) {
if (eventSource.readyState === EventSource.CLOSED) {
console.log('Connection was closed by the server.');
} else {
console.error('EventSource failed:', error);
}
eventSource.close(); // 手动关闭连接
};
// 更新页面上的响应区域
function updateResponseArea (message, p) {
p.classList = 'back'
p.innerHTML += `<span>${message}</span>`;
responseArea.appendChild(p)
}
}
</script>
</body>
</html>
结论
通过以上步骤,您已经成功地使用Node.js集成了DeepSeek的聊天完成API。这不仅能够增强应用程序的功能性,还能提供更加智能化的用户体验。希望这篇指南能帮助您顺利接入DeepSeek服务,开启探索AI之旅!
效果
由于无法放置视频,流式效果无法展现

请注意,上述代码示例基于您提供的代码进行了简化和抽象,旨在提供一个清晰的流程说明。实际开发时,请根据自己的需求进行调整和优化。
以上就是Node.js接入DeepSeek实现流式对话功能的详细内容,更多关于Node.js DeepSeek流式对话的资料请关注脚本之家其它相关文章!
来源链接:https://www.jb51.net/javascript/336591tm2.htm
© 版权声明
本站所有资源来自于网络,仅供学习与参考,请勿用于商业用途,否则产生的一切后果将由您(转载者)自己承担!
如有侵犯您的版权,请及时联系3500663466#qq.com(#换@),我们将第一时间删除本站数据。
如有侵犯您的版权,请及时联系3500663466#qq.com(#换@),我们将第一时间删除本站数据。
THE END


暂无评论内容