1、Elasticsearch安装


Elasticsearch安装 1.1 什么是elasticsearch? ElasticSearch是一个分布式,高性能、高可用、可伸缩的搜索和分析系统 。 ElasticSearch是一个基于Lucene的搜索服务器。它提供了一个分布式多用户能力的全文搜索引擎,基于RESTful web接口。Elasticsearch是用Java开发的,并作为Apache许可条款下的开放源码发布,是当前流行的企业级搜索引擎。设计用于云计算中,能够达到实时搜索,稳定,可靠,快速,安装使用方便。 1.2 linux ELK的安装 1、操作系统调整 1、操作系统默认的max_map_count[65530]太低,至少增加到[262144] [2024-02-02T14:51:35,729][INFO ][o.e.b.BootstrapChecks ] [node-1] bound or publishing to a non-loopback address, enforcing bootstrap checks ERROR: [2] bootstrap checks failed [1]: max file descriptors [20480] for elasticsearch process is too low, increase to at least [65535] [2]: max virtual memory areas vm.max_map_count [65530] is too low, increase to at least [262144]
vim /etc/sysctl.conf
vm.max_map_count=262145
root用户执行:sysctl -p 使配置生效
[core@core-O-test01 bin]$ sudo sysctl -p
net.ipv4.tcp_max_syn_backlog = 4096
net.ipv4.conf.all.rp_filter = 1
net.ipv4.conf.all.accept_redirects = 0
net.ipv4.conf.all.secure_redirects = 0
net.ipv4.conf.default.secure_redirects = 0
net.ipv4.conf.default.send_redirects = 0
net.ipv4.conf.all.send_redirects = 0
net.ipv4.tcp_tw_reuse = 1
net.ipv4.tcp_tw_recycle = 0
net.ipv4.ip_local_port_range = 50000 65535
net.ipv4.tcp_keepalive_time = 1800
net.ipv4.tcp_keepalive_probes = 5
net.ipv4.tcp_keepalive_intvl = 30
vm.max_map_count = 262145
2、最大文件描述符[4096]对于elasticsearch进程可能太低,至少增加到[65535]
ERROR: [1] bootstrap checks failed [1]: max file descriptors [20480] for elasticsearch process is too low, increase to at least [65535]
vim /etc/security/limits.conf
# 配置内容   *表示所有用户生效
* soft nofile 65536
* hard nofile 65536

# End of file
*       soft    nproc   20480
*       hard    nproc   20480
*       soft    nofile  65536
*       hard    nofile  65536

# 重新登录即可生效
# 可使用命令查看是否生效
ulimit -H -n
ulimit -a

[core@core-O-test01 bin]$ ulimit -a
core file size          (blocks, -c) 0
data seg size           (kbytes, -d) unlimited
scheduling priority             (-e) 0
file size               (blocks, -f) unlimited
pending signals                 (-i) 63405
max locked memory       (kbytes, -l) 64
max memory size         (kbytes, -m) unlimited
open files                      (-n) 20480
pipe size            (512 bytes, -p) 8
POSIX message queues     (bytes, -q) 819200
real-time priority              (-r) 0
stack size              (kbytes, -s) 8192
cpu time               (seconds, -t) unlimited
max user processes              (-u) 20480
virtual memory          (kbytes, -v) unlimited
file locks                      (-x) unlimited
2、下载
https://artifacts.elastic.co/downloads/elasticsearch/elasticsearch-6.8.3.tar.gz 3、解压 cd /home/zyplanke/elk curl -L -O
https://artifacts.elastic.co/downloads/kibana/kibana-6.8.3-linux-x86_64.tar.gz tar -xvf kibana-6.8.3-linux-x86_64.tar.gz 4、配置 1、配置elasticsearch的配置 vim config/elasticsearch.yml cluster.name: mycluster # 集群名,所有节点node都应配置相同的集群名 node.name: node1 # 本节点名,同一集群下不同的node名字不能重复 network.host: 0.0.0.0 # 本节点监听本地IP,全零为本地所有网卡 http.port: 9200 # http 协议的端口 transport.tcp.port: 9301 # 集群内节点之间的通信端口。 path.data: /app/software/elk/data/elasticsearch/data # 数据存放的路径(目录需要提前创建好,确保有权限) path.logs: /app/software/elk/data/elasticsearch/logss # 日志存放的路径(目录需要提前创建好,确保有权限) 创建目录 确保有权限 /elk/data/elasticsearch data (drwxrwxr-x) logss (drwxrwxr-x) 2、调整jvm配置 调整elasticsearch使用的jvm内存大小(可不调整,可选步骤) 未调整出现ElasticSearch拒绝连接logstash (Connection refused)问题: [2024-02-02T17:19:40,147][WARN ][logstash.outputs.elasticsearch] Attempted to resurrect connection to dead ES instance, but got an error. {:url=>”
http://10.1.110.53:9200/“, :error_type=>LogStash::Outputs::ElasticSearch::HttpClient::Pool::HostUnreachableError, :error=>”Elasticsearch Unreachable: [
http://10.1.110.53:9200/][Manticore::SocketException] 拒绝连接 (Connection refused)”}
vim config/jvm.options -Xms4g -Xms4g -Xss10m 3、elasticsearch使用了log4j2作为日志配置,如需要可调整日志配置(可选步骤)
vim config/log4j2.properties
5、执行./elasticsearch 启动 1、编写启动脚本runelasticsearch.sh 2、赋予执行权限 [core@core-O-test01 bin]$ chmod +x runelasticsearch.sh
##################################################################################
# desc:    elasticsearch运行管理脚本
###################################################################################
CURR_PWD=`pwd -P`

Usage()
{
    echo "*******************************************************"
    echo " Usage: "
    echo "  `basename $0`            : print this usage info "
    echo "  `basename $0` show       : show current running process "
    echo "  `basename $0` start      : start process"
    echo "  `basename $0` stop       : stop process"
    echo "  `basename $0` kill       : froce kill process"
    echo ""
    exit 0
}

#判断参数的参数个数,如果不符合要求,则输出用法提示
if [ $# -ne 1 ];then
    Usage
fi

case $1 in
    "show")  # 显示当前正运行的进程
      echo ""
        echo " Currently, running processes as follows....."
        echo "*******************************************************"
        #ps -f | head -1
        ps -f -u `whoami` | grep -w "elasticsearch" | grep -v "grep" | awk '{print $2}'  |xargs -r pwdx | grep -w "${CURR_PWD}" | awk -F: '{print $1}' | xargs -r ps -f -p | grep -v "grep"
        echo "*******************************************************"
        echo ""
        ;;

    "start")
        nohup ${CURR_PWD}/elasticsearch &
        echo " starting...  "
        sleep 1
        echo " Please check the result via logs files or nohup.out!"
        echo ""
        ;;

    "stop")
        ps -f -u `whoami` | grep -w "elasticsearch" | grep -v "grep" | awk '{print $2}'  |xargs -r pwdx | grep -w "${CURR_PWD}" | awk -F: '{print $1}' | xargs -r kill > /dev/null 2>&1
        echo " stoping...  "
        sleep 1
        echo " Please check the result by yourself!"
        echo ""
        ;;
    "kill")
        ps -f -u `whoami` | grep -w "elasticsearch" | grep -v "grep" | awk '{print $2}'  |xargs -r pwdx | grep -w "${CURR_PWD}" | awk -F: '{print $1}' | xargs -r kill > /dev/null 2>&1
        sleep 5
        ps -f -u `whoami` | grep -w "elasticsearch" | grep -v "grep" | awk '{print $2}'  |xargs -r pwdx | grep -w "${CURR_PWD}" | awk -F: '{print $1}' | xargs -r kill -9 > /dev/null 2>&1
        ;;
    *)
        echo " input error!!! "
        Usage
        ;;
esac
exit 0
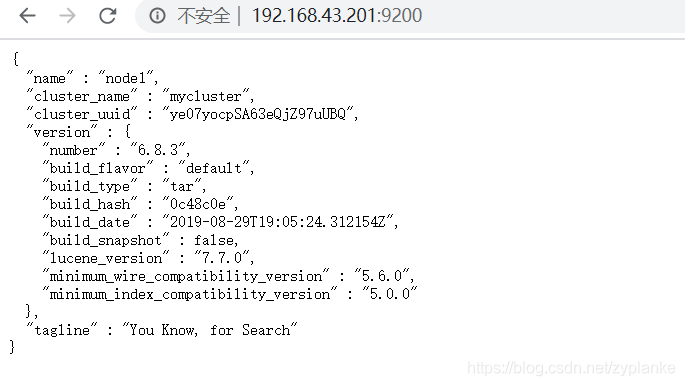
6、访问
http://192.168.43.201:9200/,正常结果如下,表明elasticsearch启动成功
./runelasticsearch start
![图片[1]-1、Elasticsearch安装-编程算法牛翰社区-数据算法-牛翰网](https://niuimg.niucores.com/wp-content/uploads/2024/10/1961020849727396511.png) 7、浏览器插件elasticsearch-head pass 8、插件安装 安装错误: [2024-02-02T16:29:57,924][WARN ][o.e.b.ElasticsearchUncaughtExceptionHandler] [node-1] uncaught exception in thread [main] org.elasticsearch.bootstrap.StartupException: java.lang.IllegalStateException: Could not load plugin descriptor for plugin directory [ik] 1、 ik分词器安装 1.download or compile optional 1 – 1、download pre-build package from here: https://github.com/medcl/elasticsearch-analysis-ik/releases 2、create plugin folder cd your-es-root/plugins/ && mkdir ik 3、上传到linux elasticsearch 插件目录, 如: plugins/ik 注意在plugins下新建ik目录 将zip包上传到ik目录下 unzip plugin to folder your-es-root/plugins/ik optional 2 – use elasticsearch-plugin to install ( supported from version v5.5.1 ): ./bin/elasticsearch-plugin install https://github.com/medcl/elasticsearch-analysis-ik/releases/download/v6.3.0/elasticsearch-analysis-ik-6.3.0.zip 2、拼音分词器 1、
7、浏览器插件elasticsearch-head pass 8、插件安装 安装错误: [2024-02-02T16:29:57,924][WARN ][o.e.b.ElasticsearchUncaughtExceptionHandler] [node-1] uncaught exception in thread [main] org.elasticsearch.bootstrap.StartupException: java.lang.IllegalStateException: Could not load plugin descriptor for plugin directory [ik] 1、 ik分词器安装 1.download or compile optional 1 – 1、download pre-build package from here: https://github.com/medcl/elasticsearch-analysis-ik/releases 2、create plugin folder cd your-es-root/plugins/ && mkdir ik 3、上传到linux elasticsearch 插件目录, 如: plugins/ik 注意在plugins下新建ik目录 将zip包上传到ik目录下 unzip plugin to folder your-es-root/plugins/ik optional 2 – use elasticsearch-plugin to install ( supported from version v5.5.1 ): ./bin/elasticsearch-plugin install https://github.com/medcl/elasticsearch-analysis-ik/releases/download/v6.3.0/elasticsearch-analysis-ik-6.3.0.zip 2、拼音分词器 1、
https://github.com/infinilabs/analysis-pinyin/releases/tag/v6.8.3 2、create plugin folder cd your-es-root/plugins/ && mkdir pinyin 3、unzip plugin to folder your-es-root/plugins/pinyin


没有回复内容