使用zabbix监控GPU


介绍
有台8卡的GPU服务器,需要监控每日GPU利用率。该服务器通过 kvm 透传的方式,启用了多台虚拟机分给不同的项目组使用。kvm透传 参考。
本次监控方案是使用 zabbix 进行,生成图表展示。整个监控准备使用 docker 来实现,确保主机环境的纯净。
基于docker安装zabbix-server
主机环境
zabbix-server: 192.168.199.61
zabbix-agent: 192.168.199.23


#主机环境
root@localhost(192.168.199.61)/root>cat /etc/redhat-release
CentOS Linux release 7.9.2009 (Core)

#docker版本
root@localhost(192.168.199.61)/root>docker info
Client: Docker Engine - Community
 Version:    26.1.4
 Context:    default
 Debug Mode: false
 Plugins:
  buildx: Docker Buildx (Docker Inc.)
    Version:  v0.14.1
    Path:     /usr/libexec/docker/cli-plugins/docker-buildx
  compose: Docker Compose (Docker Inc.)
    Version:  v2.27.1
    Path:     /usr/libexec/docker/cli-plugins/docker-compose

#docker-compose版本
root@localhost(192.168.199.61)/root>docker-compose version
Docker Compose version v2.27.1
启动zabbix-server
docker-compose.yml 如下:
services:
  mysql:
    image: mysql:8.0
    container_name: mysql
    volumes:
      - ./mysql/data:/var/lib/mysql
      - ./mysql/conf:/etc/mysql/conf.d
      - ./mysql/logs:/var/log/mysql
      - /etc/localtime:/etc/localtime
    restart: always
    privileged: true
    environment:
      #数据库信息
      - MYSQL_ROOT_PASSWORD=123456
      - MYSQL_DATABASE=zabbix
      - MYSQL_USER=zabbix
      - MYSQL_PASSWORD=zabbix
      - TZ=Asia/Shanghai
      - LANG=en_US.UTF-8
    networks:
    - zabbix-net
    expose:
      - "3306"
    command: --character-set-server=utf8mb4 --collation-server=utf8mb4_general_ci --lower_case_table_names=1 --host_cache_size=0

  zabbix-server:
    image: zabbix/zabbix-server-mysql:6.0-centos-latest
    container_name: zabbix-server
    volumes:
      - /etc/localtime:/etc/localtime
      - ./snmptraps:/var/lib/zabbix/snmptraps
      - ./mibs:/var/lib/zabbix/mibs
      - ./alertscripts:/usr/lib/zabbix/alertscripts
      - ./externalscripts:/usr/lib/zabbix/externalscripts
    restart: always
    privileged: true
    environment:
    	#数据库信息一定不要错
      - ZBX_LISTENPORT=10051
      - DB_SERVER_HOST=mysql
      - DB_SERVER_PORT=3306
      - MYSQL_DATABASE=zabbix
      - MYSQL_USERx-server=zabbix
      - MYSQL_PASSWORD=zabbix
      - MYSQL_ROOT_PASSWORD=123456
      - ZBX_CACHESIZE=1G
      - ZBX_HISTORYCACHESIZE=512M
      - ZBX_HISTORYINDEXCACHESIZE=16M
      - ZBX_TRENDCACHESIZE=256M
      - ZBX_VALUECACHESIZE=256M
      - ZBX_STARTPINGERS=64
      - ZBX_IPMIPOLLERS=1
      - ZBX_ENABLE_SNMP_TRAPS=true
      - ZBX_STARTTRAPPERS=1
      - ZBX_JAVAGATEWAY_ENABLE=true
      - ZBX_JAVAGATEWAY=zabbix-gateway
      - ZBX_STARTJAVAPOLLERS=1
    ports:
      - "10051:10051"
    networks:
    - zabbix-net
    links:
      - mysql
  zabbix-web:
    image: zabbix/zabbix-web-nginx-mysql:6.0-centos-latest
    container_name: zabbix-web
    volumes:
      - /etc/localtime:/etc/localtime
    restart: always
    privileged: true
    environment:
    	#数据库信息一定不要错
      - ZBX_SERVER_NAME=Zabbix 6.0
      - ZBX_SERVER_HOST=zabbix-server
      - ZBX_SERVER_PORT=10051
      - DB_SERVER_HOST=mysql
      - DB_SERVER_PORT=3306
      - MYSQL_DATABASE=zabbix
      - MYSQL_USER=zabbix
      - MYSQL_PASSWORD=zabbix
      - MYSQL_ROOT_PASSWORD=123456
      - PHP_TZ=Asia/Shanghai
    ports:
      - "80:8080"
    networks:
    - zabbix-net
    links:
      - mysql
      - zabbix-server

  zabbix6-agent:
    image: zabbix/zabbix-agent:centos-6.0-latest
    container_name: zabbix6-agent
    volumes:
      - /etc/localtime:/etc/localtime:ro
      - /etc/timezone:/etc/timezone:ro
      - ./zbx_env/etc/zabbix/zabbix_agentd.d:/etc/zabbix/zabbix_agentd.d:ro
      - ./zbx_env/var/lib/zabbix/modules:/var/lib/zabbix/modules:ro
      - ./zbx_env/var/lib/zabbix/enc:/var/lib/zabbix/enc:ro
      - ./zbx_env/var/lib/zabbix/ssh_keys:/var/lib/zabbix/ssh_keys:ro
    restart: always
    privileged: true
    environment:
      - ZBX_HOSTNAME=Zabbix server
      - ZBX_SERVER_HOST=zabbix-server
      - ZBX_SERVER_PORT=10051
    networks:
    - zabbix-net
    ports:
      - "10050:10050"

networks:
  zabbix-net:
    name: zabbix-net
    driver: bridge
    ipam:
      config:
      - subnet: "172.100.0.0/16"
启动docker-compose
root@localhost(192.168.199.61)/root>cd /data/zabbix-server/
root@localhost(192.168.199.61)/data/zabbix-server>ls
docker-compose.yml
root@localhost(192.168.199.61)/data/zabbix-server>docker-compose up -d
=>镜像的问题请自行解决。如需镜像请留言提供下载镜像名及版本<=
注意:这里mysql的初始化工作是非常非常慢,需要长时间耐心等待。
启动完成后,如下:
root@localhost(192.168.199.61)/data/zabbix-server>docker-compose ps -a
NAME            IMAGE                                      COMMAND                  SERVICE         CREATED              STATUS              PORTS
mysql           mysql:8.0                                  "docker-entrypoint.s…"   mysql           About a minute ago   Up About a minute   3306/tcp, 33060/tcp
zabbix-server   zabbix-server-mysql:6.0-centos-latest      "/usr/bin/tini -- /u…"   zabbix-server   About a minute ago   Up About a minute   0.0.0.0:10051->10051/tcp
zabbix-web      zabbix-web-nginx-mysql:6.0-centos-latest   "docker-entrypoint.sh"   zabbix-web      About a minute ago   Up About a minute   8443/tcp, 0.0.0.0:80->8080/tcp
zabbix6-agent   zabbix-agent:centos-6.0-latest             "/usr/bin/tini -- /u…"   zabbix6-agent   About a minute ago   Up About a minute   0.0.0.0:10050->10050/tcp
启动成功后,浏览器查看。
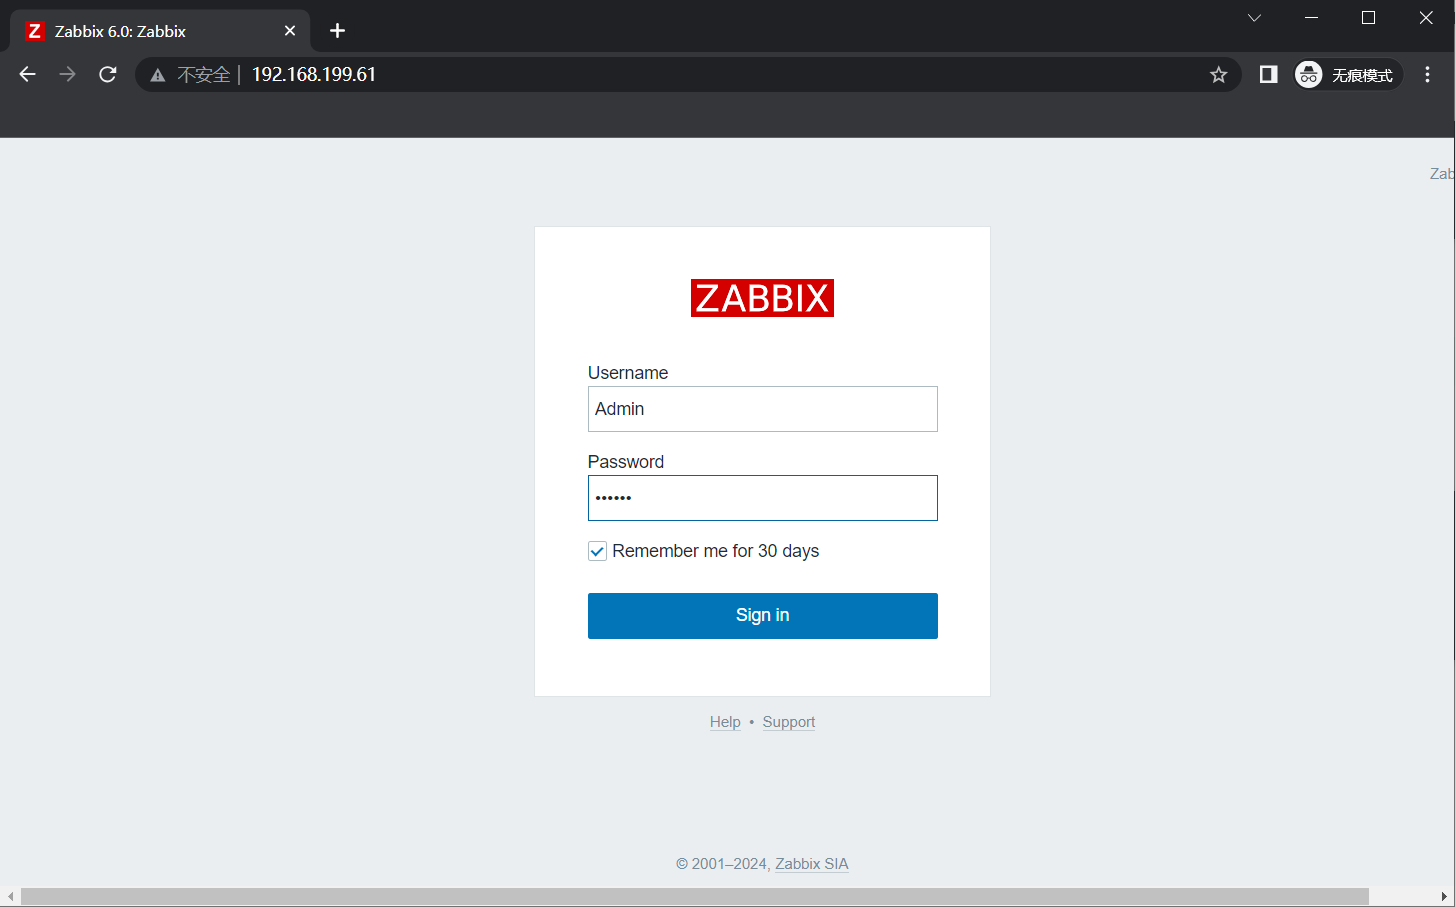
用户名:Admin
密码:zabbix
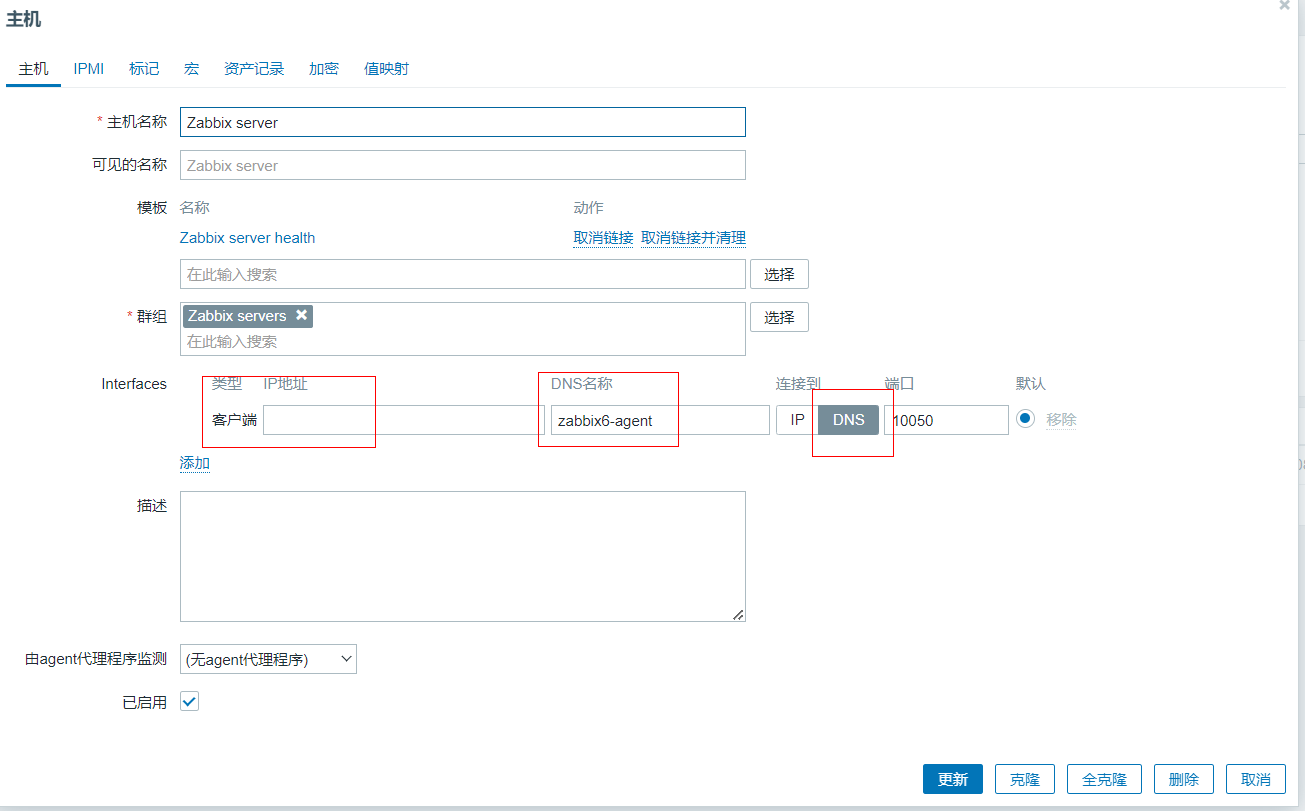
检测->主机
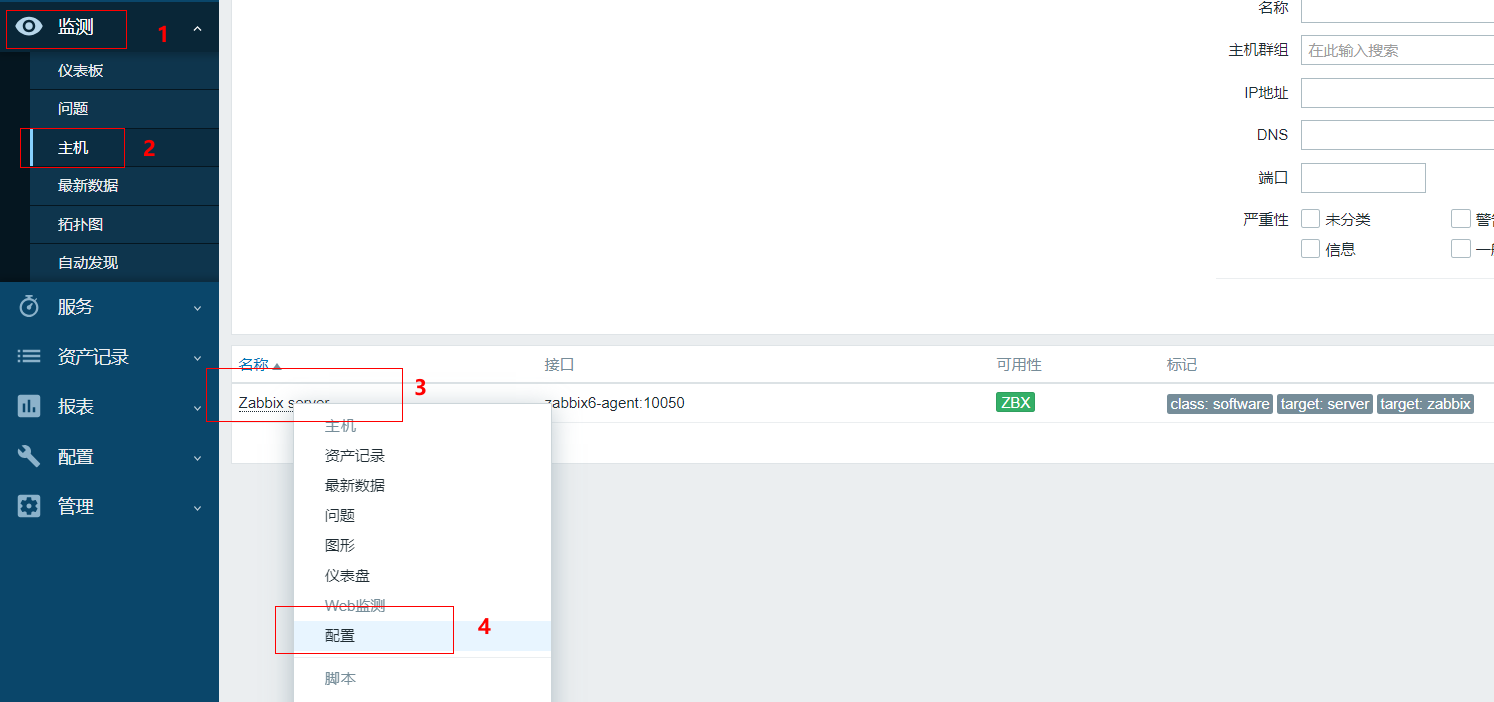
编辑 配置 将客户端 清空 DNS名称写为容器名:zabbix6-agent 连接到使用 DNS 然后点击 更新 ,等待一会,即可变成绿色。
到此,zabbix-server 安装完毕。
启动zabbix-agent
依然使用 docker-compose 启动。
注意:在后面的脚本使用中,需要用到 bc 命令,而 zabbix-agent 默认镜像中默认是不存在的,因此需要自行添加进去。
自行编写Dockerfile 文件
root@localhost(192.168.199.23)/data/zabbix-agent>cd /tmp/
root@localhost(192.168.199.23)/tmp>mkdir -pv manifests
mkdir: created directory ‘manifests’
root@localhost(192.168.199.23)/tmp>cd manifests/
root@localhost(192.168.199.23)/tmp/manifests>mkdir -pv repo
mkdir: created directory ‘repo’
root@localhost(192.168.199.23)/tmp/manifests>cd repo/

#因为镜像默认是 CentOS Stream release 8 版本,到阿里云下载 yum源
root@localhost(192.168.199.23)/tmp/manifests/repo>curl -o ./CentOS-Base.repo https://mirrors.aliyun.com/repo/Centos-vault-8.5.2111.repo
  % Total    % Received % Xferd  Average Speed   Time    Time     Time  Current
                                 Dload  Upload   Total   Spent    Left  Speed
100  2495  100  2495    0     0  10453      0 --:--:-- --:--:-- --:--:-- 10483

#做处理,删除yuncs多余的部分。
root@localhost(192.168.199.23)/tmp/manifests/repo>sed -i '/aliyuncs/d' CentOS-Base.repo

#启动一个http服务,在dockerfile中可直接下载该repo文件,避免步骤过多。

#python3.x 启动命令:python -m http.server
#python2.x 启动命令:python -m SimpleHTTPServer
root@localhost(192.168.199.23)/tmp/manifests/repo>nohup python -m http.server &
Serving HTTP on 0.0.0.0 port 8000 (http://0.0.0.0:8000/) ...

#编写dockerfile
root@localhost(192.168.199.23)/tmp/manifests/repo>cd ../
root@localhost(192.168.199.23)/tmp/manifests>cat Dockerfile
FROM zabbix-agent:centos-6.0-latest
USER root
RUN rm -rf /etc/yum.repos.d/* && \
curl -o /etc/yum.repos.d/CentOS-Base.repo http://192.168.199.23:8000/CentOS-Base.repo && \
yum install -y bc && \
yum clean all

#制作镜像
root@localhost(192.168.199.23)/tmp/manifests>docker build -t zabbix-agent:centos-6.0 ./
然后配置 docker-compose 清单文件如下:
root@localhost(192.168.199.23)~>mkdir -pv /data/zabbix-agent
mkdir: created directory ‘/data/zabbix-agent’
root@localhost(192.168.199.23)/data/zabbix-agent>cat docker-compose.yml
services:
  zabbix-agent2:
    image: zabbix-agent:centos-6.0
    container_name: zabbix-agent2
    restart: unless-stopped
    network_mode: host
    environment:
    	# ZBX_HOSTNAME信息可自定义
      - ZBX_HOSTNAME=192.168.199.23
      	# ZBX_SERVER_HOST必须指定zabbix-server IP
      - ZBX_SERVER_HOST=192.168.199.61
    volumes:
      - /etc/localtime:/etc/localtime:ro
      - /etc/timezone:/etc/timezone:ro
      - /var/run/docker.sock:/var/run/docker.sock:ro
      - /:/host:ro
      #- ./zabbix:/etc/zabbix 首次启动将配置文件拷贝到本地,后面采用挂载的方式进行。
      #- ./gpu:/opt/zabbix/agent/agentscripts/gpu
    cap_add:
      - SYS_PTRACE
    deploy:
      resources:
        reservations:
          devices:
            - driver: nvidia
              capabilities: ["gpu"]
              count: 1	# 主机的GPU数量
启动
root@localhost(192.168.199.23)/data/zabbix-agent>docker-compose up -d

#启动成功后将配置文件拷贝到本地
root@localhost(192.168.199.23)/data/zabbix-agent>docker cp zabbix-agent2:/etc/zabbix ./
Successfully copied 24.1kB to /data/zabbix-agent/./

#启用挂载的方式进行,修改 docker-compose.yml
root@localhost(192.168.199.23)/data/zabbix-agent>vim docker-compose.yml
services:
  zabbix-agent2:
    image: zabbix-agent:centos-6.0
    container_name: zabbix-agent2
    restart: unless-stopped
    network_mode: host
    environment:
      - ZBX_HOSTNAME=192.168.199.23
      - ZBX_SERVER_HOST=192.168.199.61
    volumes:
      - /etc/localtime:/etc/localtime:ro
      - /etc/timezone:/etc/timezone:ro
      - /var/run/docker.sock:/var/run/docker.sock:ro
      - /:/host:ro
      - ./zabbix:/etc/zabbix
      - ./gpu:/opt/zabbix/agent/agentscripts/gpu
    cap_add:
      - SYS_PTRACE
    deploy:
      resources:
        reservations:
          devices:
            - driver: nvidia
              capabilities: ["gpu"]
              count: 1
再次启动
root@localhost(192.168.199.23)/data/zabbix-agent>docker-compose up -d
页面配置agent
添加主机
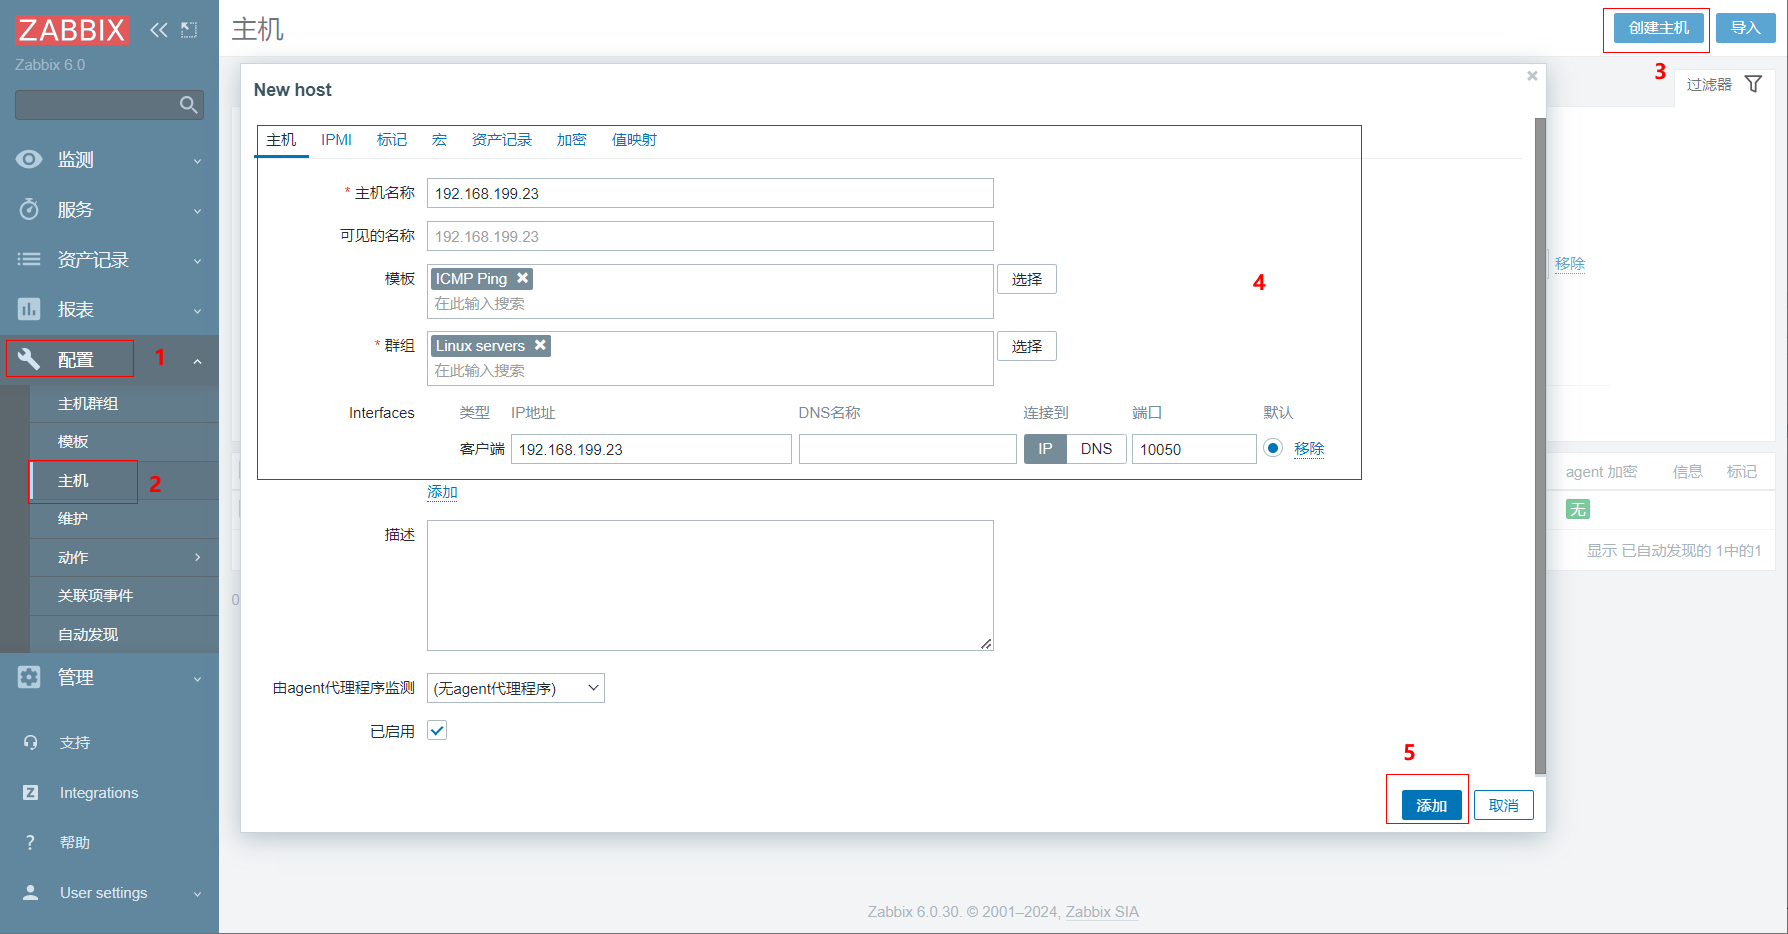
添加成功后,可以切到检测 -> 主机,查看可用性。
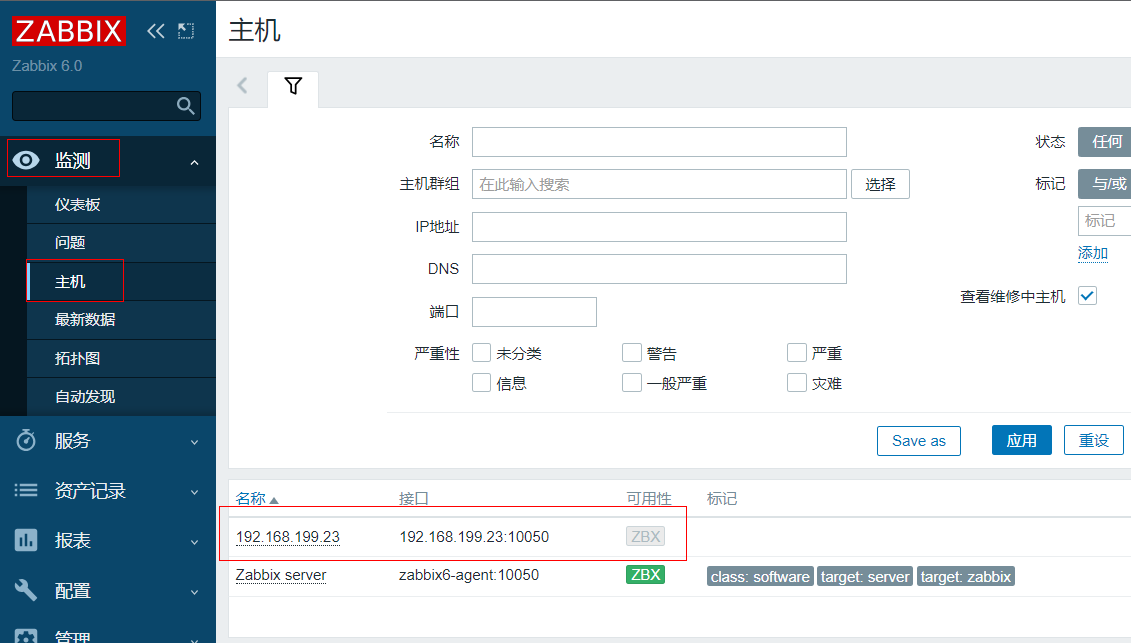
等待一会,点击 最新数据 ,如果有图形数据出现,则表示没问题。

使用zabbix监控GPU
通过上面的配置,已经将 zabbix server 和 zabbix agent 安装完毕,接下来就看如何监控GPU。
编写脚本及配置文件
模板及脚本下载地址:http://www.china-alert.com/Template/GPU.html ,谢谢前人栽树。
注意:这里尝试直接使用模板和脚本,发现监控项利用率百分比计算不准确,因此做了一些修改。
模板子模板_操作系统_Linux-GPU_主动.xml
<?xml version="1.0" encoding="UTF-8"?>
<zabbix_export>
<version>5.0</version>
<date>2023-03-30T01:43:49Z</date>
<groups>
<group>
<name>Templates</name>
</group>
</groups>
<templates>
<template>
<template>SubTemplate_OS_Linux-GPU_Active</template>
<name>子模板_操作系统_Linux-GPU_主动</name>
<groups>
<group>
<name>Templates</name>
</group>
</groups>
<applications>
<application>
<name>GPU数据</name>
</application>
</applications>
<items>
<item>
<name>GPU的数量</name>
<key>gpu.number</key>
<delay>1h</delay>
<applications>
<application>
<name>GPU数据</name>
</application>
</applications>
</item>
</items>
<discovery_rules>
<discovery_rule>
<name>GPU</name>
<key>gpu.discovery</key>
<delay>600</delay>
<description>发现GPU显卡</description>
<item_prototypes>
<item_prototype>
<name>GPU{#GPUINDEX} 风扇速率</name>
<key>gpu.check[{#GPUINDEX},fan.speed]</key>
<delay>60</delay>
<history>7d</history>
<status>DISABLED</status>
<discover>NO_DISCOVER</discover>
<value_type>FLOAT</value_type>
<units>%</units>
<applications>
<application>
<name>GPU数据</name>
</application>
</applications>
<preprocessing>
<step>
<type>MULTIPLIER</type>
<params>1</params>
</step>
</preprocessing>
</item_prototype>
<item_prototype>
<name>GPU {#GPUINDEX} 内存可用大小</name>
<key>gpu.check[{#GPUINDEX},memory.free]</key>
<delay>60</delay>
<history>7d</history>
<units>MB</units>
<applications>
<application>
<name>GPU数据</name>
</application>
</applications>
</item_prototype>
<item_prototype>
<name>GPU {#GPUINDEX} 内存总大小</name>
<key>gpu.check[{#GPUINDEX},memory.total]</key>
<delay>60</delay>
<history>7d</history>
<units>MB</units>
<applications>
<application>
<name>GPU数据</name>
</application>
</applications>
</item_prototype>
<item_prototype>
<name>GPU {#GPUINDEX} 内存使用大小</name>
<key>gpu.check[{#GPUINDEX},memory.used]</key>
<delay>60</delay>
<history>7d</history>
<units>MB</units>
<applications>
<application>
<name>GPU数据</name>
</application>
</applications>
</item_prototype>
<item_prototype>
<name>GPU {#GPUINDEX} 已使用电源功率</name>
<key>gpu.check[{#GPUINDEX},power.draw]</key>
<delay>60</delay>
<history>7d</history>
<value_type>FLOAT</value_type>
<units>dW</units>
<applications>
<application>
<name>GPU数据</name>
</application>
</applications>
<preprocessing>
<step>
<type>MULTIPLIER</type>
<params>0.1</params>
</step>
</preprocessing>
</item_prototype>
<item_prototype>
<name>GPU {#GPUINDEX} 温度</name>
<key>gpu.check[{#GPUINDEX},temperature.gpu]</key>
<delay>60</delay>
<history>7d</history>
<value_type>FLOAT</value_type>
<units>C</units>
<applications>
<application>
<name>GPU数据</name>
</application>
</applications>
<trigger_prototypes>
<trigger_prototype>
<expression>{last()}>70</expression>
<name>[主机]GPU {#GPUINDEX} 温度大于70°C</name>
<priority>WARNING</priority>
<description>[主机]GPU {#GPUINDEX} 温度大于70°C</description>
<dependencies>
<dependency>
<name>[主机]GPU {#GPUINDEX} 温度大于75°C</name>
<expression>{SubTemplate_OS_Linux-GPU_Active:gpu.check[{#GPUINDEX},temperature.gpu].last()}>75</expression>
</dependency>
</dependencies>
</trigger_prototype>
<trigger_prototype>
<expression>{last()}>75</expression>
<name>[主机]GPU {#GPUINDEX} 温度大于75°C</name>
<priority>HIGH</priority>
<description>[主机]GPU {#GPUINDEX} 温度大于75°C</description>
<dependencies>
<dependency>
<name>[主机]GPU {#GPUINDEX} 温度大于80°C</name>
<expression>{SubTemplate_OS_Linux-GPU_Active:gpu.check[{#GPUINDEX},temperature.gpu].last()}>80</expression>
</dependency>
</dependencies>
</trigger_prototype>
<trigger_prototype>
<expression>{last()}>80</expression>
<name>[主机]GPU {#GPUINDEX} 温度大于80°C</name>
<priority>DISASTER</priority>
<description>[主机]GPU {#GPUINDEX} 温度大于80°C</description>
</trigger_prototype>
</trigger_prototypes>
</item_prototype>
<item_prototype>
<name>GPU {#GPUINDEX} 使用率</name>
<key>gpu.utilization[{#GPUINDEX}]</key>
<delay>60</delay>
<history>7d</history>
<units>%</units>
<applications>
<application>
<name>GPU数据</name>
</application>
</applications>
</item_prototype>
</item_prototypes>
<graph_prototypes>
<graph_prototype>
<name>GPU {#GPUINDEX} Memory</name>
<graph_items>
<graph_item>
<color>00AA00</color>
<item>
<host>SubTemplate_OS_Linux-GPU_Active</host>
<key>gpu.check[{#GPUINDEX},memory.free]</key>
</item>
</graph_item>
<graph_item>
<sortorder>1</sortorder>
<color>0000DD</color>
<item>
<host>SubTemplate_OS_Linux-GPU_Active</host>
<key>gpu.check[{#GPUINDEX},memory.used]</key>
</item>
</graph_item>
</graph_items>
</graph_prototype>
<graph_prototype>
<name>GPU {#GPUINDEX} Temperature, Fan Speed and Power</name>
<graph_items>
<graph_item>
<color>1A7C11</color>
<item>
<host>SubTemplate_OS_Linux-GPU_Active</host>
<key>gpu.check[{#GPUINDEX},power.draw]</key>
</item>
</graph_item>
<graph_item>
<sortorder>1</sortorder>
<color>2774A4</color>
<item>
<host>SubTemplate_OS_Linux-GPU_Active</host>
<key>gpu.check[{#GPUINDEX},fan.speed]</key>
</item>
</graph_item>
<graph_item>
<sortorder>2</sortorder>
<color>F63100</color>
<item>
<host>SubTemplate_OS_Linux-GPU_Active</host>
<key>gpu.check[{#GPUINDEX},temperature.gpu]</key>
</item>
</graph_item>
</graph_items>
</graph_prototype>
<graph_prototype>
<name>GPU {#GPUINDEX} Utilization</name>
<graph_items>
<graph_item>
<color>2774A4</color>
<item>
<host>SubTemplate_OS_Linux-GPU_Active</host>
<key>gpu.utilization[{#GPUINDEX}]</key>
</item>
</graph_item>
</graph_items>
</graph_prototype>
</graph_prototypes>
</discovery_rule>
</discovery_rules>
</template>
</templates>
</zabbix_export>
脚本
脚本1:get_gpu_check.sh
#!/bin/sh
gpuid="$1"
gpuname="$2"
result=`/usr/bin/nvidia-smi --query-gpu=${gpuname} --format=csv,noheader,nounits -i ${gpuid} | tr -d "\n"`
echo ${result}

脚本2:get_gpu_info.sh
#!/bin/sh

result=$(/usr/bin/nvidia-smi -L | sed 's/^GPU \([0-9]*\):.*(UUID: \(.*\))$/,{"{#GPUINDEX}":"\1","{#GPUUUID}":"\2"}/g')

first=1

echo "{"
echo "\"data\":["

for line in ${result[@]}
do
  if [ "$first" == "1" ]; then
    echo ${line:1}
    first=0
  else
    echo -n $line
  fi
done

echo
echo "]"
echo "}"

脚本3:get_utilization.sh
#!/bin/bash
gpuid="$1"
total=`/usr/bin/nvidia-smi --query-gpu=memory.total --format=csv,noheader,nounits -i ${gpuid}`
used=`/usr/bin/nvidia-smi --query-gpu=memory.used --format=csv,noheader,nounits -i ${gpuid}`
result=$(printf "%.0f" `echo "scale=2; $used / $total * 100" | bc`)
echo ${result}
配置文件 gpu.conf
UserParameter=gpu.number,/usr/bin/nvidia-smi -L | /usr/bin/wc -l
UserParameter=gpu.discovery,/opt/zabbix/agent/agentscripts/gpu/get_gpu_info.sh
UserParameter=gpu.check[*],/opt/zabbix/agent/agentscripts/gpu/get_gpu_check.sh $1 $2
UserParameter=gpu.utilization[*],/opt/zabbix/agent/agentscripts/gpu/get_utilization.sh $1
=>以上三类文件非常重要,复制粘贴到对应目录下!<=
root@localhost(192.168.199.23)/data/zabbix-agent>tree
.
├── docker-compose.yml
├── gpu #三个脚本目录
│   ├── get_gpu_check.sh
│   ├── get_gpu_info.sh
│   └── get_utilization.sh
└── zabbix
    ├── zabbix_agentd
    │   ├── userparameter_examples.conf
    │   └── userparameter_mysql.conf
    ├── zabbix_agentd.conf
    └── zabbix_agentd.d #配置文件目录
        └── gpu.conf

4 directories, 8 files


### 模板文件用于通过页面zabbix导入系统 ###
配置完成后,一定要重启容器才能生效。
root@localhost(192.168.199.23)/data/zabbix-agent>docker restart zabbix-agent2
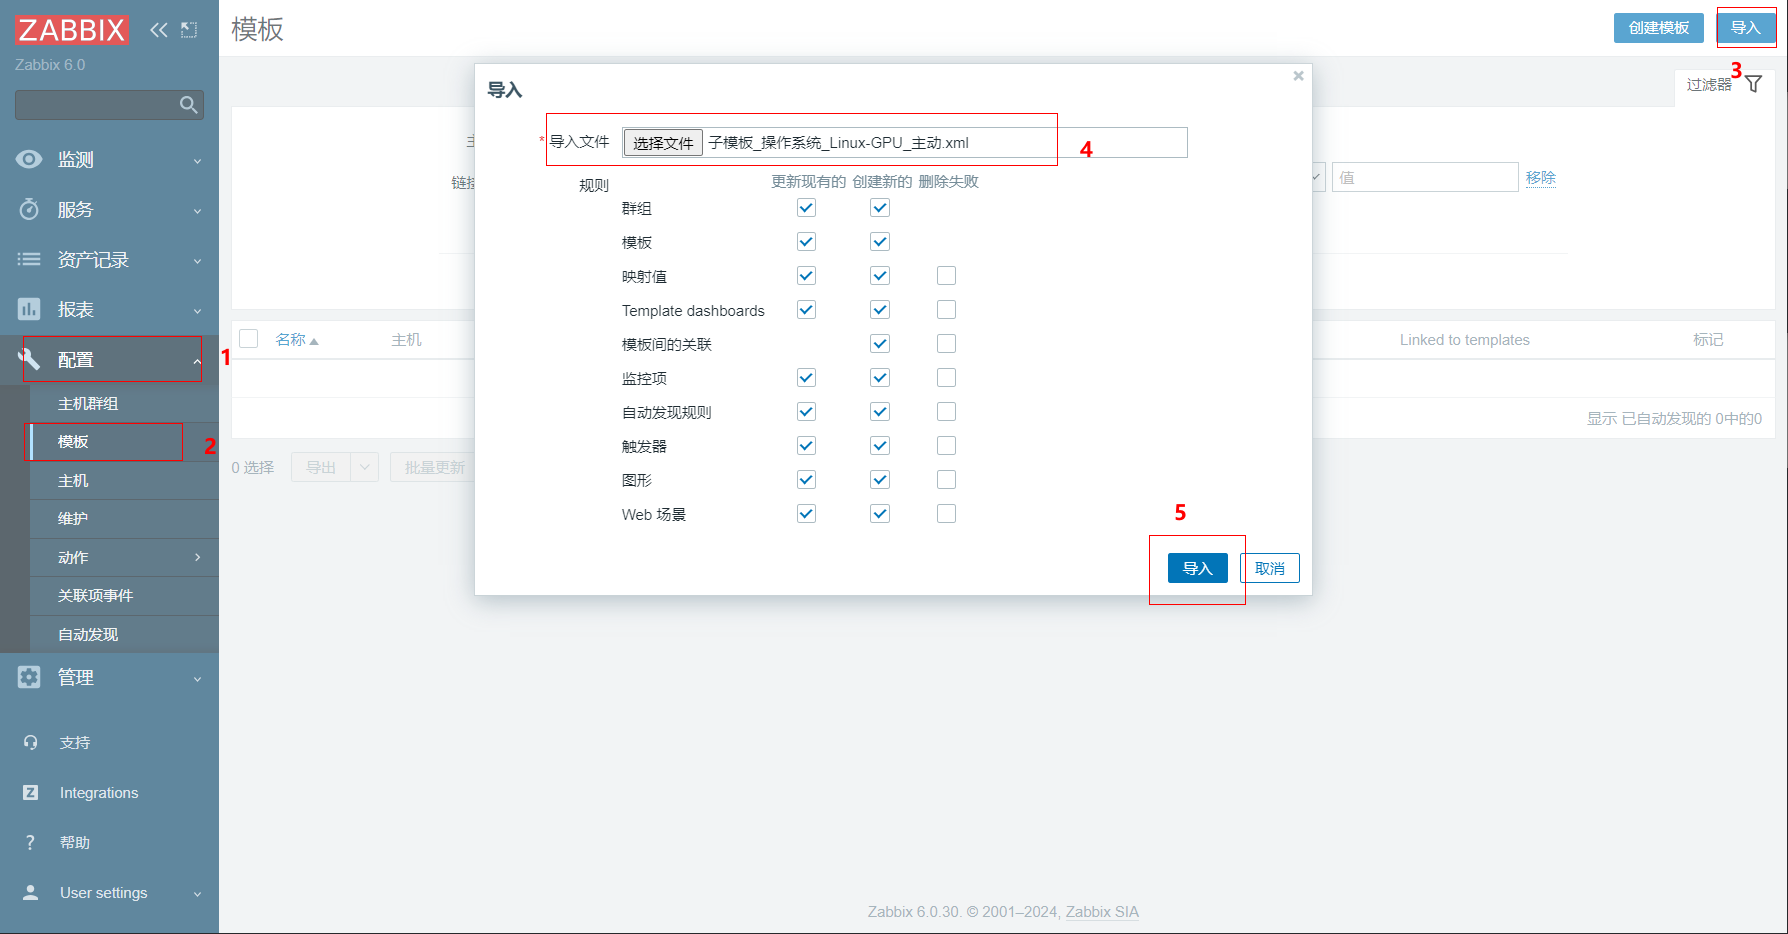
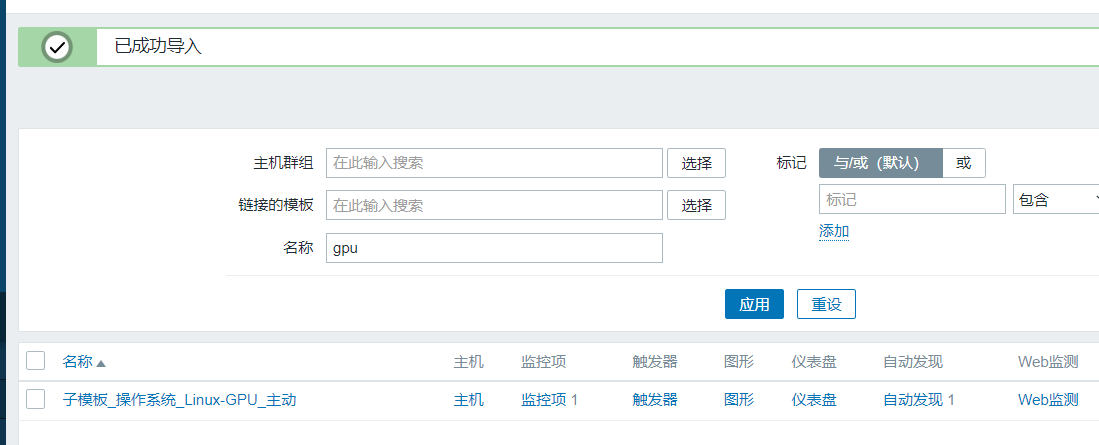
页面添加模板
导入template模板文件
为主机添加模板

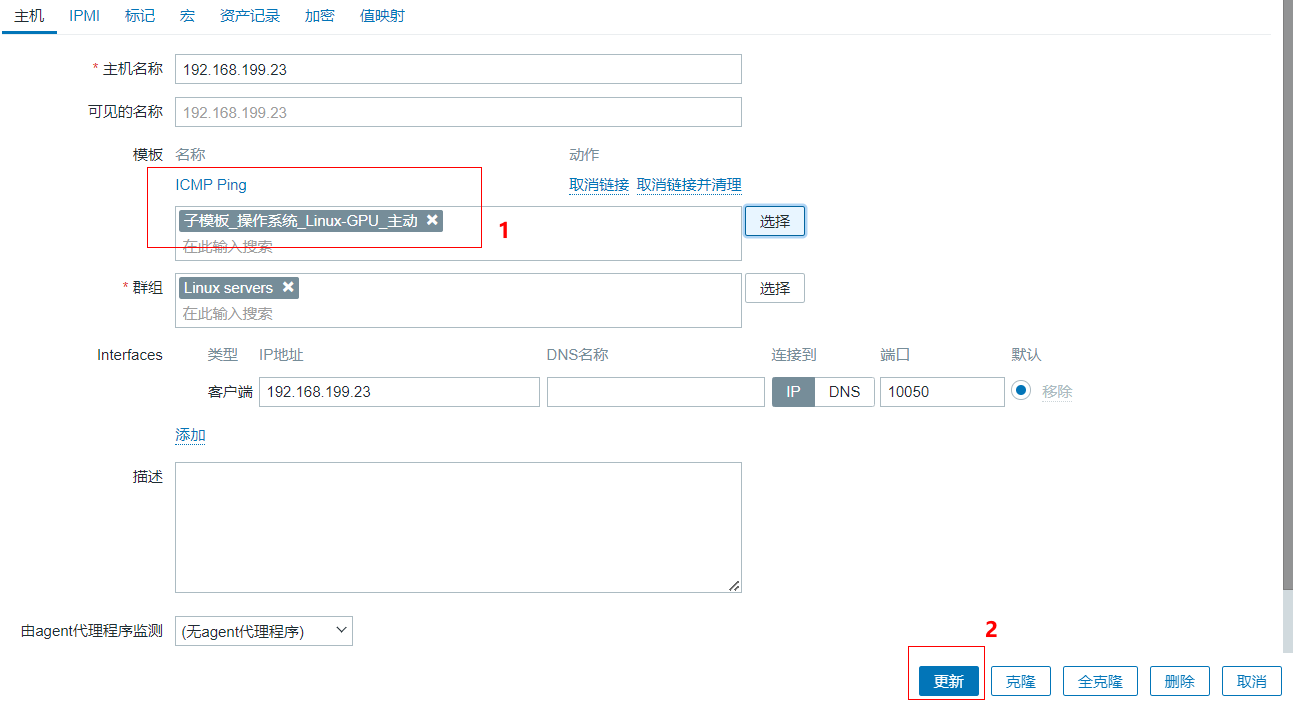
添加完模板后,稍等一会就会有数据。
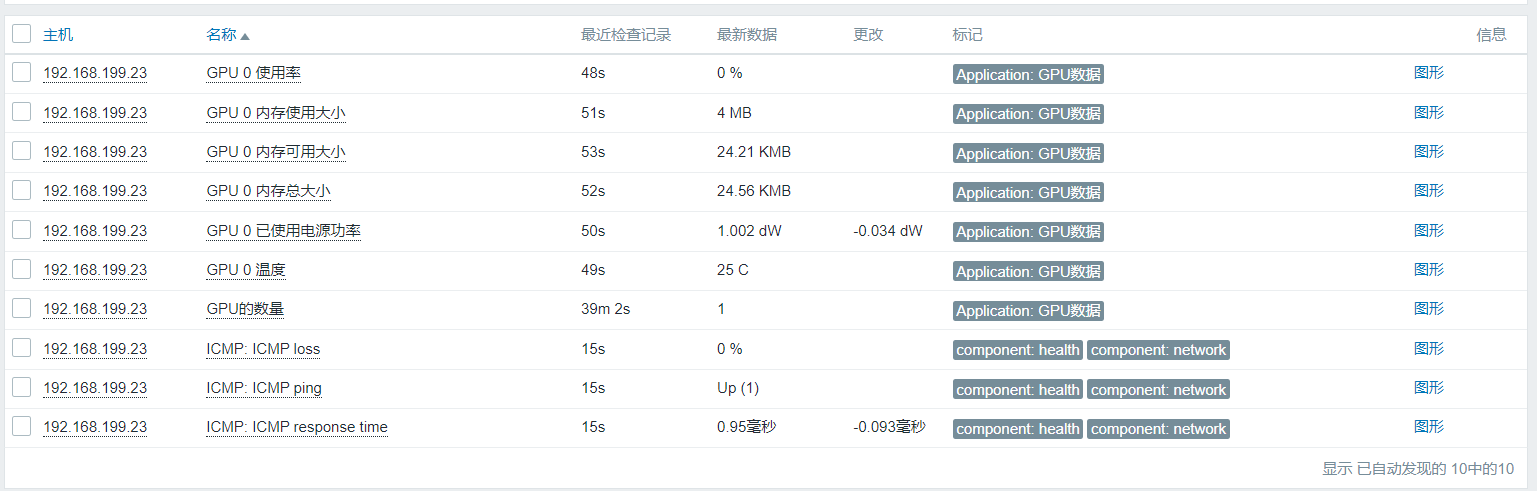
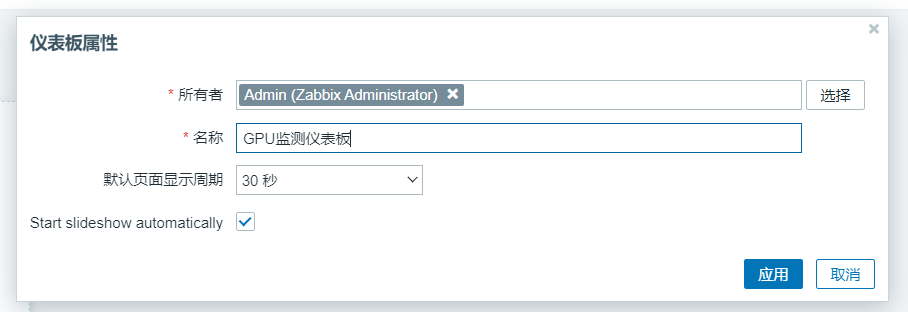
添加仪表板
检测 -> 仪表板
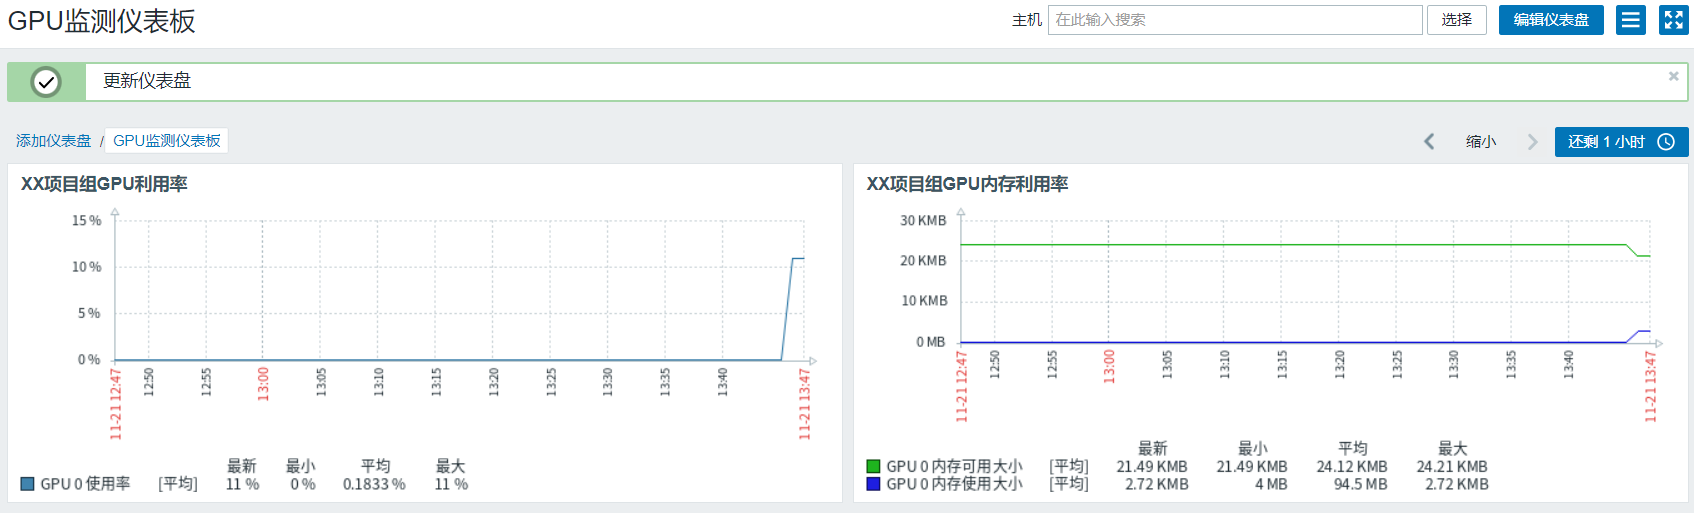
添加构件

仪表板完成后的展示:
— EOF —


没有回复内容